Plugin eVis
The Biodiversity Informatics Facility at the American Museum of Natural History’s (AMNH) Center for Biodiversity and Conservation (CBC) (this section is derived from Horning, N., K. Koy, P. Ersts. 2009. eVis (v1.1.0) User’s Guide. American Museum of Natural History, Center for Biodiversity and Conservation. Available from http://biodiversityinformatics.amnh.org/, and released under the GNU FDL.) has developed the Event Visualization Tool (eVis), another software tool to add to the suite of conservation monitoring and decision support tools for guiding protected area and landscape planning. This plugin enables users to easily link geocoded (i.e., referenced with latitude and longitude or X and Y coordinates) photographs, and other supporting documents, to vector data in QGIS.
eVis is now automatically installed and enabled in new versions of QGIS, and as with all plugins, it can be disabled and enabled using the Plugin Manager (See Gestione dei plugin).
Il plugin consta di tre moduli, Connessione Database, ID evento, Browser evento che permettono di collegare a vettori in QGIS foto ed altri documenti geocodificati (es. con coordinate X,Y o lat/long).
Browser evento
The Event Browser module provides the functionality to display geocoded photographs that are linked to vector features displayed in the QGIS map window. Point data, for example, can be from a vector file that can be input using QGIS or it can be from the result of a database query. The vector feature must have attribute information associated with it to describe the location and name of the file containing the photograph and, optionally, the compass direction the camera was pointed when the image was acquired. Your vector layer must be loaded into QGIS before running the Event Browser.
Aprire il modulo Browser evento
Per aprire la finestra di dialogo del modulo, cliccare sul pulsante  Sfoglia evento eVis oppure Database ‣ eVis ‣ Sfoglia evento eVis. Si aprirà una finestra generica Browser evento.
The Event Browser window has three tabs displayed at the top of the window. The Display tab is used to view the photograph and its associated attribute data. The Options tab provides a number of settings that can be adjusted to control the behavior of the eVis plugin. Lastly, the Configure External Applications tab is used to maintain a table of file extensions and their associated application to allow eVis to display documents other than images.
Scheda Visualizza
To see the Display window click on the Display tab in the Event Browser window. The Display window is used to view geocoded photographs and their associated attribute data.
Figure eVis 1:
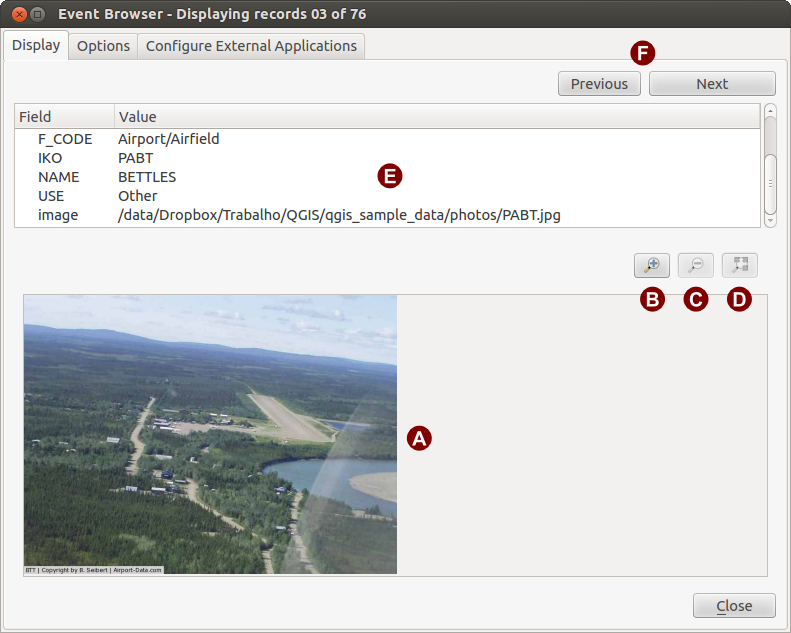
The eVis display window
Area di visualizzazione dell’immagine: è il riquadro inferiore della scheda.
Ingrandisci: ingrandisce l’immagine per avere più dettagli. Se l’immagine è troppo grande per l’area di visualizzazione, compaiono delle barre di scorrimento.
Rimpicciolisci: rimpicciolisce l’immagine.
Zoom completo: visualizza tutta l’immagine.
Finestra degli attributi: è il riquadro superiore della finestra. Qui sono mostrate le informazioni del punto associato alla foto che si sta visualizzando. Se il file associato al punto non è un’immagine ed il tipo di file è definito nella scheda Configura applicazioni esterne, facendo doppio-click sul suo percorso viene avviata l’applicazione adatta a gestire quel tipo di file. Se l’estensione del file è riconosciuta, l’attributo sarà mostrato in verde.
Pulsanti per la navigazione: usare i pulsanti Precedente all’altro.
Scheda Opzioni
Figure eVis 2:
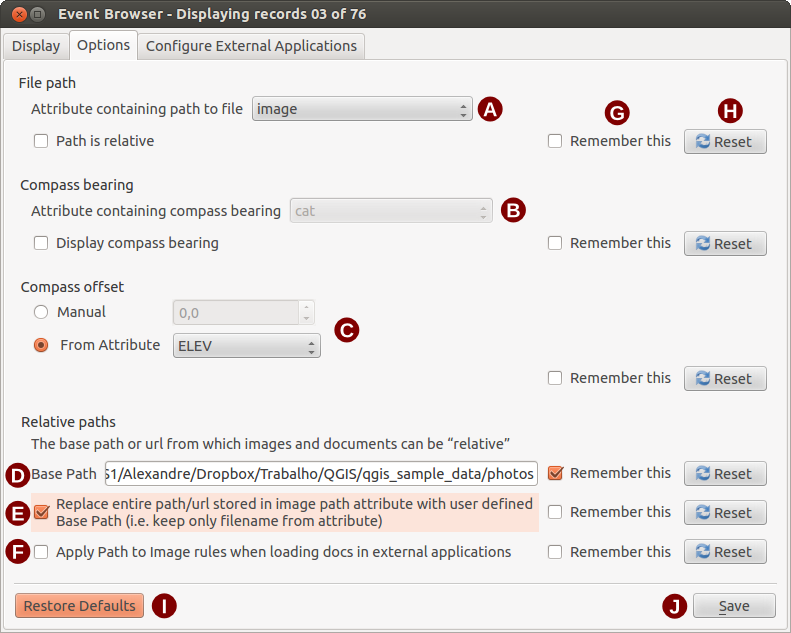
The eVis Options window
Percorso file: menu a tendina che permette di selezionare l’attributo contenente il percorso o l’URL della foto o altro documento da visualizzare. In caso di percorso relativo, attivare la casella di controllo
 Il percorso è relativo: il percorso di base del percorso relativo può essere indicato nella casella di testo ’Percorso base’. Informazioni di dettaglio sulle diverse opzioni per specificare la localizzazione di un file sono disponibili nella sezione Specificare la localizzazione ed il nome di una foto.
- Compass bearing: A dropdown list to specify the attribute field that contains the compass bearing associated with the photograph being displayed. If compass bearing information is available it is necessary to click the checkbox below the dropdown menu title.
- Compass offset: Compass offsets can be used to compensate for
declination (adjust bearings collected using magnetic bearings to true north
bearings). Click the
 Manual radiobutton to enter
the offset in the text box or click the
From Attribute radiobutton to select the attribute field
containing the offsets. For both of these options east declinations should
be entered using positive values and west declinations should use negative
values.
Manual radiobutton to enter
the offset in the text box or click the
From Attribute radiobutton to select the attribute field
containing the offsets. For both of these options east declinations should
be entered using positive values and west declinations should use negative
values. Percorso base: il percorso di base utilizzato dal percorso relativo definito in Figura Figure_eVis_2 (A).
Sostituisci percorso: se attivo, soltanto il nome del file in A sarà aggiunto al percorso di base.
Applica il percorso dell’immagine se attivo, le stesse regole di percorso definito per le foto saranno applicate a documenti tipo video, testo, audio.
- Remember settings: If the checkbox is checked the values for the associated parameters will be saved for the next session when the window is closed or when the [Save] button below is pressed.
Ripristina: reimposta il campo al valore predefinito.
- Restore defaults: This will reset all of the fields to their default settings. It has the same effect as clicking all of the [Reset] buttons.
Salva: salva le impostazioni senza chiudere la scheda Opzioni.
Configura applicazioni esterne
Figure eVis 3:

The eVis External Applications window
Tabella riferimento file: una tabella contenente i vari tipi di file utilizzati da eVis. Ogni tipo file necessita di un’estensione e di un percorso all’applicazione in grado di gestirlo. Ciò permette di aprire diversi tipi di file come filmati, suoni e documenti testuali, oltre che solo immagini.
Aggiungi nuovo tipo file: aggiunge un nuovo tipo di file (estensione ed applicazione).
Elimina riga corrente: elimina il tipo di file selezionato in tabella.
Specificare la localizzazione ed il nome di una foto
La localizzazione ed il nome di una foto possono essere memorizzati tramite un percorso relativo o assoluto o tramite un URL se la foto risiede su un server web: seguono degli esempi dei vari approcci (Tabella evis_examples).
X        Y        FILE                                                BEARING
780596   1784017  C:\Workshop\eVis_Data\groundphotos\DSC_0168.JPG     275
780596   1784017  /groundphotos/DSC_0169.JPG                          80
780819   1784015  http://biodiversityinformatics.amnh.org/\
                  evis_testdata/DSC_0170.JPG                          10
780596   1784017  pdf:http://www.testsite.com/attachments.php?\
                  attachment_id-12                                    76
Specificare la localizzazione ed il nome di altri documenti
Altri documenti come testo, video e audio possono essere visualizzati e gestiti da eVis, basta assicurarsi di aver impostato per ogni tipo di file estensione e applicazione nella scheda Configura applicazioni esterne della finestra di dialogo Browser evento; è, inoltre, necessario disporre del percorso o URL del file nella tabella attributi di un layer vettoriale. Come regola addizionale, se l’URL non contiene l’estensione del tipo file, è possibile anteporre l’estensione all’URL secondo il formato estensione:URL. L’URL è preceduto dall’estensione file e dal segno : (due punti) (Tabella evis_examples).
Using the Event Browser
Se tutto è correttamente impostato, lanciando il Browser evento verrà visualizzata una foto. Se la foto non appare è necessario aggiustare qualche parametro nella finestra Opzioni.
Se nella tabella attributi si fa riferimento ad un documento (o ad un’immagine in un formato non supportato da eVis) ed il tipo di file è stato configurato nella scheda Configura applicazioni esterne, il campo contente il percorso al file è evidenziato in verde: per aprire il documento, fare doppio-click sul testo evidenziato in verde. Se un documento è configurato nella tabella degli attributi, ma il testo non appare evidenziato in verde, è necessario aggiustare il nome del file nella scheda Configura applicazioni esterne. Se invece l’evidenziatura è presente, ma facendo doppio click il file non si apre, allora è necessario aggiustare qualche parametro nella scheda Opzioni.
If no compass bearing is provided in the Options window a red asterisk will be displayed on top of the vector feature that is associated with the photograph being displayed. If a compass bearing is provided then an arrow will appear pointing in the direction indicated by the value in the compass bearing display field in the Event Browser window. The arrow will be centered over the point that is associated with the photograph or other document.
To close the Event Browser window click on the [Close] button from the Display window.
Strumento ID evento
The ‘Event ID’ module allows you to display a photograph by clicking on a feature displayed in the QGIS map window. The vector feature must have attribute information associated with it to describe the location and name of the file containing the photograph and optionally the compass direction the camera was pointed when the image was acquired. This layer must be loaded into QGIS before running the ‘Event ID’ tool.
Aprire ID Evento
To launch the ‘Event ID’ module either click on the  Event ID
icon or click on Database ‣ eVis ‣ Event ID Tool. This will
cause the cursor to change to an arrow with an ‘i’ on top of it signifying that
the ID tool is active.
Event ID
icon or click on Database ‣ eVis ‣ Event ID Tool. This will
cause the cursor to change to an arrow with an ‘i’ on top of it signifying that
the ID tool is active.
To view the photographs linked to vector features in the active vector layer displayed in the QGIS map window, move the Event ID cursor over the feature and then click the mouse. After clicking on the feature, the Event Browser window is opened and the photographs on or near the clicked locality are available for display in the browser. If more than one photograph is available, you can cycle through the different features using the [Previous] and [Next] buttons. The other controls are described in the ref:evis_browser section of this guide.
Connessione database eVis
Il modulo Connessione Database permette di connettersi ed interrogare un database o altre risorse ODBC, es. un foglio di calcolo.
eVis can directly connect to four types of databases:PostgreSQL, MySQL, SQLite, and can also read from ODBC connections (e.g.MS Access). When reading from an ODBC database (such as an Excel spreadsheet) it is necessary to configure your ODBC driver for the operating system you are using.
Aprire Connessione Database
To launch the ‘Database Connection’ module either click on the appropriate icon
 eVis Database Connection or click on Database ‣
eVis ‣ Database Connection. This will launch the Database Connection
window. The window has three tabs: Predefined Queries,
Database Connection, and SQL Query. The Output
Console window at the bottom of the window displays the status of actions
initiated by the different sections of this module.
eVis Database Connection or click on Database ‣
eVis ‣ Database Connection. This will launch the Database Connection
window. The window has three tabs: Predefined Queries,
Database Connection, and SQL Query. The Output
Console window at the bottom of the window displays the status of actions
initiated by the different sections of this module.
Connessione Database
Aprire la scheda Connessione Database, cliccare su Tipo Database  e selezionare il tipo di database al quale ci si vuole collegare. Se necessario, si possono inserire Username e Password.
Enter the database host in the Database Host textbox. This option is not available if you selected ‘MS Access’ as the database type. If the database resides on your desktop you should enter “localhost”.
Enter the name of the database in the Database Name textbox. If you selected ‘ODBC’ as the database type, you need to enter the data source name.
Una volta configurati tutti i parametri cliccare su [Connetti]: la Console di Output informa dell’esito dell’operazione, sia positivo che negativo.
Figure eVis 4:
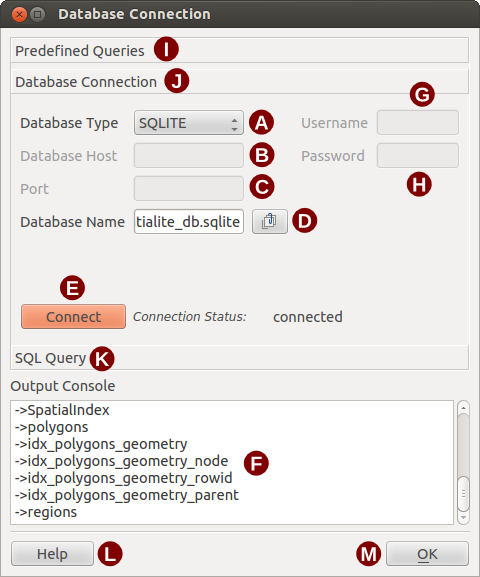
The eVis Database connection window
Tipo di Database: per specificare il tipo di database cui connettersi.
Host Database: nome host del database.
Porta: numero della porta di connessione in caso di database MYSQL o PostgreSQL.
Nome Database: nome del database.
Connetti: pulsante di connessione.
Console di Output: finestra dei messaggi sullo stato della connessione.
Nome utente: nome utente in caso di database protetto.
Password: password in caso di database protetto.
Query Predefinite: scheda “Query Predefinite”.
Connessione Database: scheda “Connessione Database”.
Query SQL: scheda “Query SQL”.
Help: mostra la guida in linea.
OK: chiude Connessione Database .
Eseguire query SQL
SQL queries are used to extract information from a database or ODBC resource. In eVis the output from these queries is a vector layer added to the QGIS map window. Click on the SQL Query tab to display the SQL query interface. SQL commands can be entered in this text window. A helpful tutorial on SQL commands is available at http://www.w3schools.com/sql. For example, to extract all of the data from a worksheet in an Excel file, select * from [sheet1$] where sheet1 is the name of the worksheet.
Per eseguire una query cliccare su [Esegui Query] : in caso di esito positivo si aprirà la finestra di dialogo Scegli file Database altrimenti la Console di Output mostrerà un messaggio di errore.
Nella finestra Scegli file Database assegnare un nome al nuovo layer che sarà creato dai risultati della query.
Figure eVis 5:
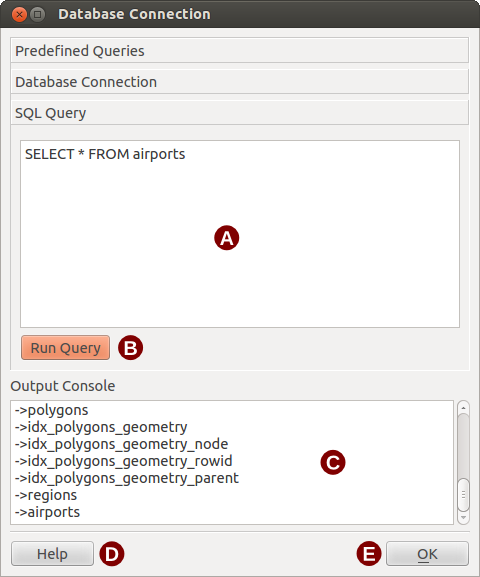
The eVis SQL query tab
Query SQL: è il riquadro per inserire le query SQL.
Esegui Query: pulsante per mandare in esecuzione una query.
Console di Output: mostra i messaggi relativi all’esecuzione delle query.
Help: mostra la guida in linea.
OK: chiude Connessione Database.
Use the X Coordinate and Y Coordinate
comboboxes to select the field from the database that store the
X (or longitude) and Y (or latitude) coordinates. Clicking on the [OK]
button causes the vector layer created from the SQL query to be displayed in the
QGIS map window.
To save this vector file for future use, you can use the QGIS ‘Save as...’ command that is accessed by right clicking on the layer name in the QGIS map legend and then selecting ‘Save as...’
Suggerimento
Creare un layer vettoriale da un foglio di lavoro Microsoft Excel
When creating a vector layer from a Microsoft Excel Worksheet you might see that unwanted zeros (“0”) have been inserted in the attribute table rows beneath valid data.This can be caused by deleting the values for these cells in Excel using the Backspace key. To correct this problem you need to open the Excel file (you’ll need to close QGIS if there if you are connected to the file to allow you to edit the file) and then use Edit ‣ Delete to remove the blank rows from the file. To avoid this problem you can simply delete several rows in the Excel Worksheet using Edit ‣ Delete before saving the file.
Eseguire query predefinite
Nella scheda Query Predefinite è possibile caricare query da file esterni in XML. Questa possibilità è molto utile se non si ha molta dimestichezza con il linguaggio SQL.
Per caricare query predefinite, cliccare su  Apri File: quando una query è caricata, il titolo della stessa appare nel menu a tendina sotto Apri File e una breve descrizione è visualizzata nella casella di testo sottostante.
Selezionare la query che si intende usare e aprire la scheda Query SQL per vedere che la query è stata caricata nella finestra. Se è la prima volta che si sta lanciando una query, assicurarsi di essere connessi al database.
Cliccare su [Esegui Query] nella scheda Query SQL per eseguire il comando. Se la query ha avuto successo si aprirà la finestra Seleziona file Database. Al contrario, se la query non ha avuto successo, apparirà un messaggio di errore nella Console di Output.
Figure eVis 6:
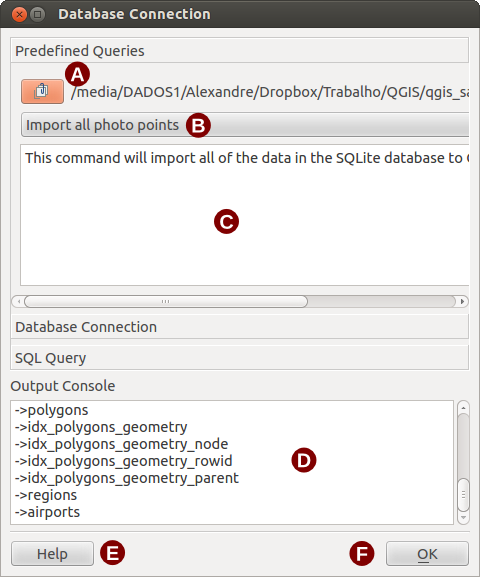
The eVis Predefined queries tab
- Open File: Launches the “Open File” file browser to search for the XML file holding the predefined queries.
Query predefinite: elenco delle query disponibili nel file XML.
Descrizione query: breve descrizione della query derivata dal file XML.
Console di Output: mostra i messaggi relativi all’esecuzione delle query.
Help: mostra la guida in linea.
OK: chiude Connessione Database .
Formato XML per le query predefinite di eVis
Tag XML letti da eVis
| Tag | Descrizione |
|---|---|
| query | Definisce l’inizio e la fine di una istruzione di query. |
| shortdescription | Breve descrizione della query che viene mostrata nel menu a tendina di eVis. |
| description | Descrizione più dettagliata che viene mostrata nella casella ’Descrizione query’ di eVis. |
| databasetype | Tipo di database come definito in ’Tipo Database’ nella scheda Connessione Database . |
| databaseport | La porta di connessione come definito in ’Porta’ nella scheda Connessione Database . |
| databasename | Il nome del database come definito in ’Nome Database’ nella scheda Connessione Database. |
| databaseusername | Nome utente come definito in ’Nome utente’ nella scheda Connessione Database. |
| databasepassword | Password come definito in’Nome utente’nella scheda Connessione Database |
| sqlstatement | Il comando SQL. |
| autoconnect | Valore “true”(vero) o “false”(falso): in caso di “true”, i tag sopra elencati saranno usati per connettersi automaticamente al database, senza avviare la procedura di Connessione Database . |
Segue un esempio completo di file XML contenente tre query:
<?xml version="1.0"?>
<doc>
 <query>
   <shortdescription>Import all photograph points</shortdescription>
   <description>This command will import all of the data in the SQLite database to QGIS
      </description>
   <databasetype>SQLITE</databasetype>
   <databasehost />
   <databaseport />
   <databasename>C:\textbackslash Workshop/textbackslash
eVis\_Data\textbackslash PhotoPoints.db</databasename>
   <databaseusername />
   <databasepassword />
   <sqlstatement>SELECT Attributes.*, Points.x, Points.y FROM Attributes LEFT JOIN
      Points ON Points.rec_id=Attributes.point_ID</sqlstatement>
   <autoconnect>false</autoconnect>
 </query>
  <query>
   <shortdescription>Import photograph points "looking across Valley"</shortdescription>
   <description>This command will import only points that have photographs "looking across
      a valley" to QGIS</description>
   <databasetype>SQLITE</databasetype>
   <databasehost />
   <databaseport />
   <databasename>C:\Workshop\eVis_Data\PhotoPoints.db</databasename>
   <databaseusername />
   <databasepassword />
   <sqlstatement>SELECT Attributes.*, Points.x, Points.y FROM Attributes LEFT JOIN
      Points ON Points.rec_id=Attributes.point_ID where COMMENTS='Looking across
      valley'</sqlstatement>
   <autoconnect>false</autoconnect>
 </query>
 <query>
   <shortdescription>Import photograph points that mention "limestone"</shortdescription>
   <description>This command will import only points that have photographs that mention
      "limestone" to QGIS</description>
   <databasetype>SQLITE</databasetype>
   <databasehost />
   <databaseport />
   <databasename>C:\Workshop\eVis_Data\PhotoPoints.db</databasename>
   <databaseusername />
   <databasepassword />
   <sqlstatement>SELECT Attributes.*, Points.x, Points.y FROM Attributes LEFT JOIN
      Points ON Points.rec_id=Attributes.point_ID where COMMENTS like '%limestone%'
      </sqlstatement>
   <autoconnect>false</autoconnect>
 </query>
</doc>