Generalități despre Compozitorul de Hărți
Compozitorul de Hărți oferă capabilități în creștere de aspect și de imprimare. Acesta permite adăugarea elementelor, cum ar fi canevasul hărților QGIS, etichete de text, imagini, legende, scări grafice, forme de bază, săgeți, tabele de atribute și cadre HTML. Există posibilitatea de dimensionare, grupare, aliniere, poziționare și rotire a fiecărui element și de reglare a proprietăților, în scopul punerii în pagină. Hărțile pot fi tipărite sau exportate ca formate de imagine, PostScript, PDF sau SVG (exportul către SVG nu funcționează corect cu unele versiuni recente de Qt4; ar trebui să încercați și să verificați în mod individual pe sistemul dumneavoastră). Aveți posibilitatea să salvați un șablon, pe care să-l încărcați din nou într-o altă sesiune. În cele din urmă, generarea mai multor hărți pe baza unui șablon poate fi realizată prin intermediul generatorului atlasului.
Sesiune de Probă
Before you start to work with the Print Composer, you need to load some raster
or vector layers in the QGIS map canvas and adapt their properties to suit your
own convenience. After everything is rendered and symbolized to your liking,
click the  New Print Composer icon in the toolbar or
choose File ‣ New Print Composer. You will be prompted to
choose a title for the new Composer.
New Print Composer icon in the toolbar or
choose File ‣ New Print Composer. You will be prompted to
choose a title for the new Composer.
Pentru a demonstra cum se poate crea o hartă folosiți următoarele instrucțiuni.
- On the left side, select the
 Add new map toolbar button
and draw a rectangle on the canvas holding down the left mouse button.
Inside the drawn rectangle the QGIS map view to the canvas.
Add new map toolbar button
and draw a rectangle on the canvas holding down the left mouse button.
Inside the drawn rectangle the QGIS map view to the canvas. - Select the
 Add new scalebar toolbar button and click
with the left mouse button on the Print Composer canvas. A scalebar will be
added to the canvas.
Add new scalebar toolbar button and click
with the left mouse button on the Print Composer canvas. A scalebar will be
added to the canvas. - Select the
 Add new legend toolbar button and draw a
rectangle on the canvas holding down the left mouse button.
Inside the drawn rectangle the legend will be drawn.
Add new legend toolbar button and draw a
rectangle on the canvas holding down the left mouse button.
Inside the drawn rectangle the legend will be drawn. Selectați pictograma
 Select/Move item pentru a selecta harta de pe canevas și pentru a o muta un pic.
- While the map item is still selected you can also change the size of the map item. Click while holding down the left mouse button, in a white little rectangle in one of the corners of the map item and drag it to a new location to change it’s size.
- Click the Item Properties tab on the left lower panel and find the setting for the orientation. Change the value of the setting Map orientation to ‘15.00° ‘. You should see the orientation of the map item change.
- Now, you can print or export your print composition to image formats, PDF or to SVG with the export tools in Composer menu.
În cele din urmă, puteți salva compoziția cu ajutorul butonului
 Salvare Proiect.
You can add multiple elements to the Composer. It is also possible to have more than one map view or legend or scale bar in the Print Composer canvas, on one or several pages. Each element has its own properties and, in the case of the map, its own extent. If you want to remove any elements from the Composer canvas you can do that with the Delete or the Backspace key.
Managerul Compozițiilor
The Composer Manager is the main window to manage print composers in the project.
It helps you add new print composer, duplicate an existing one, rename or delete it.
To open the composer manager dialog, click on the  Composer Manager button in the toolbar or choose Composer
‣ Composer Manager. It can also be reached from the main window of QGIS with
Project ‣ Composer Manager.
Composer Manager button in the toolbar or choose Composer
‣ Composer Manager. It can also be reached from the main window of QGIS with
Project ‣ Composer Manager.
Figure Composer Manager:
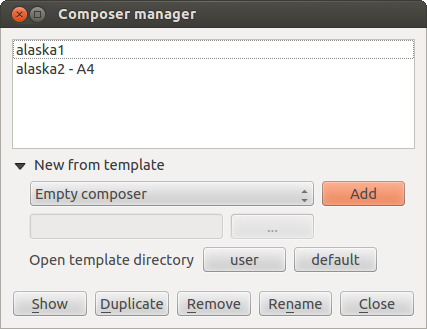
Managerul Compozitorului de Hărți
The composer manager lists in its upper part all the available print composers in the project. The bottom part shows tools that help to:
a arăta compozito(arele) selectate: puteți deschide mai multe compozitoare de hărți printr-un singur clic
- duplicate the selected composer (available only if one print composer is selected): it creates a new composer using the selected composer as template. You’ll be prompted to choose a new title for the new composer
- rename the composer (also available only if one print composer is selected): You’ll be prompted to choose a new title for the composer. Note that you can also rename the composer by double-clicking on its title in the upper part
- remove the composer: the selected print composer(s) will be deleted from the project.
With the Composer Manager, it’s also possible to create new print composers as an empty composer or from a saved template. By default, QGIS will look for templates in user directory (~/.qgis2/composer_templates) or application’s one (ApplicationFolder/composer_templates). QGIS will retrieve all the available templates and propose them in the combobox. The selected template will be used to create a new composer when clicking Add button. You can also save composer templates in another folder. Choosing specific in the template list offers the ability to select such template and use it to create a new print composer.
Meniuri, instrumente și panouri ale compozitorului de hărți
Opening the Print Composer provides you with a blank canvas that represents the paper surface when using the print option. Initially you find buttons on the left beside the canvas to add map composer items: the current QGIS map canvas, text labels, images, legends, scale bars, basic shapes, arrows, attribute tables and HTML frames. In this toolbar you also find toolbar buttons to navigate, zoom in on an area and pan the view on the composer and toolbar buttons to select a map composer item and to move the contents of the map item.
Figure_composer_overview prezintă o vedere inițială a Compozitorului de Hărți, înainte de adăugarea oricăror elemente.
Figure Composer Overview:
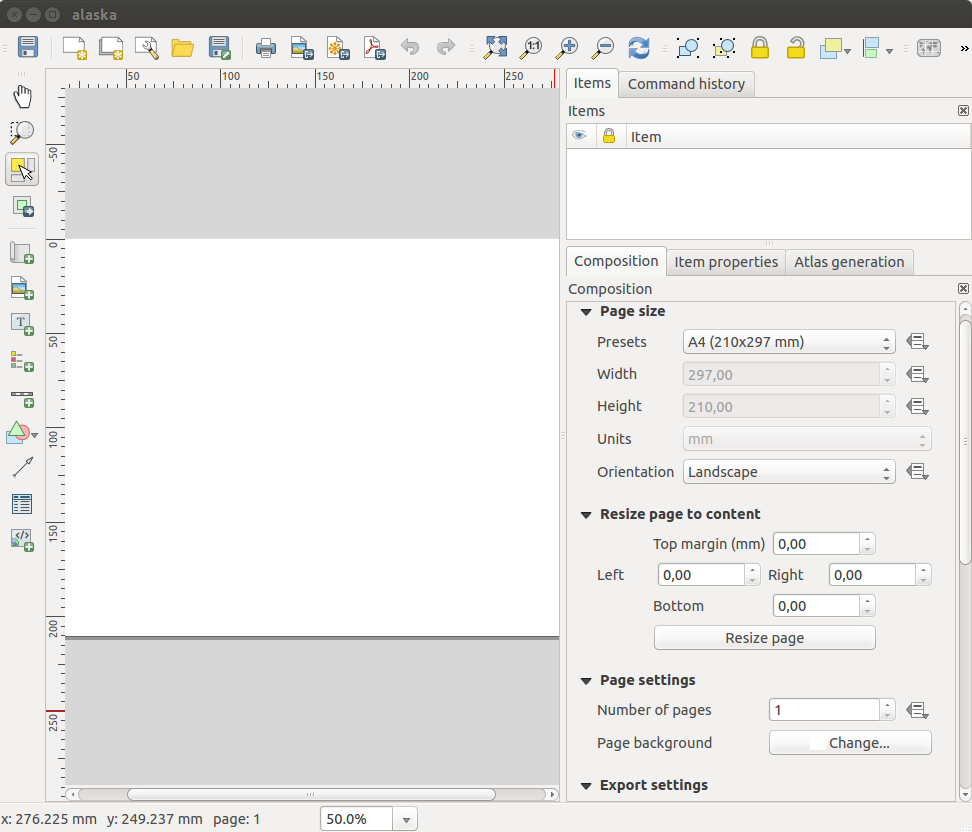
Compozitorul de Hărți
On the right beside the canvas you find two panels. The upper panel holds the tabs Items and Command History and the lower panel holds the tabs Composition, Item properties and Atlas generation.
Fila Elementelor oferă o listă a tuturor elementelor adăugate în canevasul hărții din compozitor.
- The Command history tab displays a history of all changes applied to the Print Composer layout. With a mouse click, it is possible to undo and redo layout steps back and forth to a certain status.
- The Composition tab allows you to set paper size, orientation, the page
background, number of pages and print quality for the output file in dpi. Furthermore,
you can also activate the
 Print as raster checkbox. This means
all items will be converted to raster before printing or saving as PostScript or PDF.
In this tab, you can also customize settings for grid and smart guides.
Print as raster checkbox. This means
all items will be converted to raster before printing or saving as PostScript or PDF.
In this tab, you can also customize settings for grid and smart guides. - The Item Properties tab displays the properties for the selected
item. Click the Select/Move item icon to select
an item (e.g., legend, scale bar or label) on the canvas. Then click the
Item Properties tab and customize the settings for the selected
item.
Fila de Generare a atlasului vă permite să activați generarea unui atlas pentru Compozitorul curent, oferindu-vă acces la parametrii săi.
În partea de jos a ferestrei Compozitorului de Hărți, puteți găsi o bară de stare cu poziția mouse-ului, numărul curent al paginii, o casetă combinată pentru a seta nivelul de mărire, numărul de elemente selectate, dacă este cazul și, atunci când are loc generarea atlasului, numărul de entități.
In the upper part of the Print composer window, you can find menus and other toolbars. All Print Composer tools are available in menus and as icons in a toolbar. See a list of tools in table_composer_1.
The toolbars and the tabs can be switched off and on using the right mouse button over any toolbar or through View ‣ Toolbars or View ‣ Panels.
Instrumente
Pictogramă |
Scop |
Pictogramă |
Scop |
|---|---|---|---|
|
Salvare Proiect |
|
Compozitor Nou |
 |
Duplicare Compozitor |
|
Managerul Compozițiilor |
 |
Încărcare din șablon |
 |
Salvare ca șablon |
 |
Imprimă sau exportă ca PostScript |
 |
Exportare într-un format de imagine |
 |
Exportă compoziția în format SVG |
 |
Exportare ca PDF |
 |
Revenire la ultima modificare |
 |
Restaurare conform ultimei modificări |
 |
Transfocare pe ansamblu |
 |
Transfocare la &100% |
 |
Mărire |
|
Micșorare |
 |
Actualizează Vizualizarea |
||
 |
Deplasare |
 |
Transfocare la o regiune specifică |
|
Selectează/Mută elementul din compoziție |
 |
Mută conținutul în interiorul unui element |
|
Adaugă noua hartă din canevasul hărții QGIS |
 |
Adaugă imaginea în compoziție |
 |
Adaugă eticheta în compoziție |
|
Adaugă noua legendă în compoziție |
|
Adaugă scara grafică în compoziție |
 |
Adaugă formele de bază în compoziție |
 |
Adaugă săgeata în compoziție |
 |
Adaugă tabela de atribute în compoziție |
 |
Adaugă un cadru HTML |
||
 |
Grupează elementele în compoziție |
 |
Degrupează elementele din compoziție |
 |
Blochează Elementele Selectate |
 |
Deblochează Toate Elementele |
 |
Ridică elementele selectate |
 |
Coboară elementele selectate |
 |
Mută în capătul de sus elementele selectate |
 |
Mută în capătul de jos elementele selectate |
 |
Aliniere la stânga a elementelor selectate |
 |
Aliniere la dreapta a elementelor selectate |
 |
Aliniere în centru a elementelor selectate |
 |
Aliniere în centru, pe verticală, a elementelor selectate |
 |
Aliniere în sus a elementelor selectate |
 |
Aliniere în jos a elementelor selectate |
 |
Previzualizare atlas |
 |
Prima Entitate |
 |
Entitatea Anterioară |
 |
Entitatea Următoare |
 |
Ultima entitate |
|
Imprimare Atlas |
|
Exportare Atlas sub formă de Imagine |
 |
Setări Atlas |
Tabelul Compozițiilor 1: Instrumentele Compozitorului de Hărți
Meniul Compozitorului
With the Composer ‣ Save Project action, you can save the project file directly from the print composer window. The Composer menu also provides actions to:
- Create a new and blank print composer with New Composer...
- Duplicate Composer... : Create a new print composer
by duplicating the current one
Deschideți
Managerul de Compoziții...Print Composers... : Deschideți un compozitor de hărți existent
Once the layout is designed, with Save as template
and Add items from template icons, you can save
the current state of a Print Composer session as a .qpt template
and load its item again in another session.
In the Composer menu, there are also powerful ways to share
geographical information produced with QGIS that can be included in reports or
published. These tools are Export as Image...,
Export as PDF..., Export as
SVG... and Print....
Meniul de Vizualizare
Instrumentele de Navigare
Pentru a naviga în structura canevasului, Compozitorul de Hărți oferă o serie de instrumente generale:
- Mărire
 Micșorare
- Transfocare la nivelul Hărții
- Transfocare la 100%
- Actualizarea vizualizării (dacă vizualizarea se află într-o stare inconsistentă)
Afișarea Grilei în spatele elementelor.
Grila de Acroșare pentru fixarea elementelor pe grilă.
- Show Guides to help user to align items. These are red line that you can click in the rule (above or at the left side of the layout) and drag and drop to the desired location.
- Snap Guides: allows user to snap items to the guides,
- Smart Guides: uses other composer items as guides to dynamically snap to as user moves or reshapes an item.
- Clear Guides to remove all current guides.
Afișarea Casetei de Încadrare în jurul elementelor.
Afișarea Riglelor în jurul compoziției.
- Show Pages or set up pages to transparent. Often composer is used to create non-print layouts, e.g. for inclusion in presentations or other documents, and it’s desirable to export the composition using a totally transparent background. It’s sometimes referred to as “infinite canvas” in other editing packages.
- Toggle Full Screen makes the composer window to full screen.
- Hide Panels hides/shows the right panel
- Panels lists all panels available to hide/show them.
- Toolbars same as above for toolbars.
You can change the zoom level also using the mouse wheel or the combo box in the status bar. If you need to switch to pan mode while working in the Composer area, you can hold the Spacebar or the mouse wheel. With Ctrl+Spacebar, you can temporarily switch to Zoom In mode, and with Ctrl+Shift+Spacebar, to Zoom Out mode.
Ascunderea și Afișarea Panourilor
Pentru a maximiza spațiul disponibil la interacțiunea cu o compoziție, puteți folosi View –> Ascunderea panourilor sau puteți apăsa F10.
Note
It’s also possible to switch to a full screen mode to have more space to
interact by pressing F11 or using View ‣
Toggle full screen.
Fila Compoziției
Dimensiunea paginii și alte setări
În fila Compozițiilor, puteți defini setările globale ale compoziției dvs. curente
Figure Composition 1:
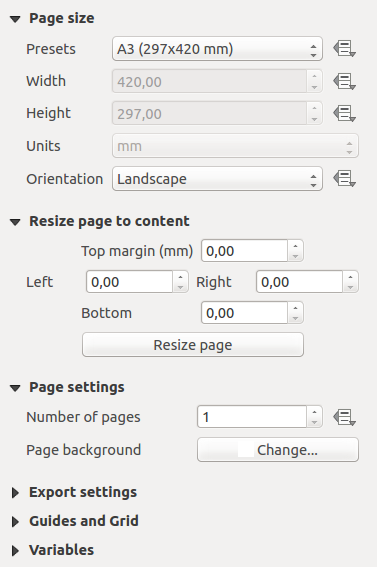
Setările Compozitorului de Hărți
Puteți alege unul dintre formatele de Presetare pentru pagina dvs, sau să introduceți propriile valori pentru lățime, înălțime și unități. Puteți folosi, de asemenea, pagina Orientare.
Composition can be divided into several pages. For instance, a first page can show a map canvas, and a second page can show the attribute table associated with a layer, while a third one shows an HTML frame linking to your organization website. Set the Number of pages to the desired value. you can also custom the Page Background with the color or the symbol you want.
The Page size options apply to all the pages in the composition. However, you can modify the values using the data defined override options (see Butoane de Suprascriere Definită de Date).
A custom page size can also be set, using the Resize page tool. This creates an unique page composition, resizes the page to fit the current contents of the composition (with optional margins).
Setări de export
You can define a resolution to use for all exported maps in Export
resolution. This setting can however be overridden each time you are exporting a map.
When checked, print as raster means all elements will be
rasterized before printing or saving as PostScript or PDF.
While exporting to an image file format, you can choose to generate a world file
by checking World file on and select a map item.
The world file is created beside the exported map, has same name and contains
information to easily georeference it.
Figure Composition 2:
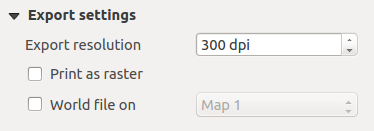
Setările de Export din Compozitorul de Hărți
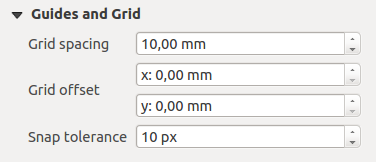
Grilă și de ghidaje
Se pot pune unele marcaje de referință pe foaia de hârtie a compoziției dvs., care vor ajuta la plasarea unor elemente. Aceste marcaje pot fi:
- simple lines (called Guides) put at the position you want. To do that, ensure that Show Rulers and Show Guides in View menu are checked. Then, click and drag from within the ruler to the paper sheet. A vertical or horizontal line is added to the paper and you can set its position following the coordinates displayed at the left bottom of the composer dialog.
sau Grila obișnuită.
Whether grids or guides should be shown is set in View menu. There, you can also decide if they might be used to snap composer items. The Grid and guides section lets you customize grid settings like Grid spacing, Grid offset and Snap tolerance to your need. The tolerance is the maximum distance below which an item is snapped to a grid or a guide.
Figure Composition 3:
Setările grilei din Compozitorul de Hărți
In the Options ‣ Composer menu in QGIS main canvas, you can also set the spacing, offset and snap tolerance of the grid as much as its style and color. These options are applied by default to any new print composer.
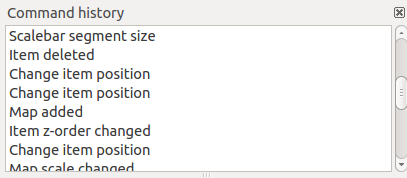
Fila Istoricului de Comenzi: Acțiuni de Revenire și Restaurare
During the layout process, it is possible to revert and restore changes. This can be done with the revert and restore tools:
- Anulează ultima modificare
- Restaurează ultima modificare
This can also be done by mouse click within the Command history tab (see figure_composer_1). The History tab lists the last actions done within the composer. Just select the point you want to revert to and once you do new action all the actions done after the selected one will be removed.
Figure Composer 1:
Istoricul Comenzilor din Compozitorul de Hărți
Fila Elementelor
The Items tab offers some options to manage selection and visibility of items. All the items added to the print composer canvas are shown in a list and selecting an item makes the corresponding row selected in the list as well as selecting a row does select the corresponding item in the print composer canvas. This is thus a handy way to select an item placed behind another one. Note that a selected row is shown as bold.
Oricărui element selectat, îi puteți:
 seta sau nu vizibilitatea,
- bloca sau debloca poziția,
- order its Z position. You can move up and down each item in the list with a click and drag. The upper item in the list will be brought to the foreground in the print composer canvas. By default, a newly created item is placed in the foreground.
schimba numele, făcând dublu-clic pe text.
Once you have found the correct position for an item, you can lock it by ticking
the box in column. Locked items are not selectable on the canvas.
Locked items can be unlocked by selecting the item in the Items
tab and unchecking the tickbox or you can use the icons on the toolbar.