Generarea unui Rezultat
Figure_composer_output_1 prezintă un exemplu de așezare în pagină în Compozitorul de Hărți, inclusiv fiecare tip de element de hartă descris în secțiunea anterioară.
Figure Composer Output 1:
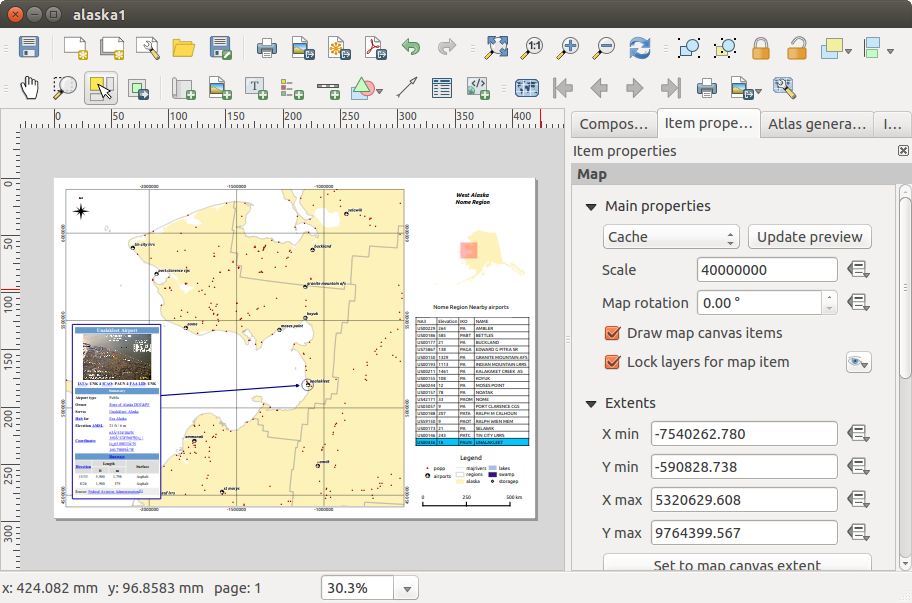
Compozitorul de Hărți, căruia i s-au adăugat vizualizarea hărții, legenda, o imagine, o scară, coordonate, un text și un cadru HTML
Before printing a layout you have the possibility to view your composition
without bounding boxes. This can be enabled by deactivating View –>
 Show bounding boxes or pressing the shortcut
Ctrl+Shift+B.
Show bounding boxes or pressing the shortcut
Ctrl+Shift+B.
Compozitorul de Hărți vă permite să creați mai multe formate de ieșire, fiind posibilă definirea rezoluției (calitatea imprimării) și a dimensiunilor hârtiei:
- The
 Print icon allows you to print the layout to a
connected printer or a PostScript file, depending on installed printer drivers.
Print icon allows you to print the layout to a
connected printer or a PostScript file, depending on installed printer drivers. - The
 Export as image icon exports the Composer
canvas in several image formats, such as PNG, BPM, TIF, JPG,...
Export as image icon exports the Composer
canvas in several image formats, such as PNG, BPM, TIF, JPG,... - The
 Export as SVG icon saves the Print Composer canvas
as an SVG (Scalable Vector Graphic).
Export as SVG icon saves the Print Composer canvas
as an SVG (Scalable Vector Graphic). - The
 Export as PDF icon saves the defined Print Composer
canvas directly as a PDF.
Export as PDF icon saves the defined Print Composer
canvas directly as a PDF.
Exportare ca imagine
Clicking the Export as image icon will ask you to
enter the filename to use to export composition: in case of multi-page composition,
each page will be exported to a file with the given name appended with the page
number.
You can then override the print resolution (set in Composition tab) and resize exported image dimensions.
Prin bifarea opțiunii Decupare în funcție de conținut, imaginea generată de compozitor va include doar suprafața compoziției care are un conținut. Există, de asemenea, o opțiune de adăugare a unor margini în jurul limitelor elementelor, dacă este necesar.
În cazul în care compoziția include o singură pagină, atunci ieșirea va fi dimensionată pentru a include TOTUL în compoziție. Dacă este o compoziție pe mai multe pagini, atunci fiecare pagină va fi decupată pentru a include din acea pagină numai zona cu elemente.
Figure Composer Output 2:
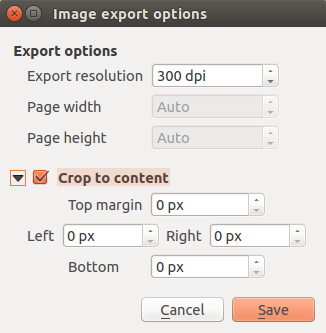
Opțiuni de Export ale Imaginii
If you need to export your layout as a georeferenced image (e.g., to share
with other projects), you need to enable this feature under the Composition tab.
Check World file on and choose the map item to use.
With this option, the ‘Export as image’ action will create a world file along
the exported image.
Note
Exportul rasterelor mari poate eșua uneori, chiar dacă pare a exista suficientă memorie. Aceasta este, de asemenea, o problemă de management a rasterelor, care ține de Qt.
Exportare ca SVG
With Export as SVG, you also need to fill the filename
(used as a basename for all files in case of multi_page composition) and then
can apply Crop to content option.
În plus, dialogul opțiunilor de export vă permit :
exportarea straturilor hărții ca grupuri svg:
randarea etichetelor hărții ca și contururi
Figure Composer Output 3:
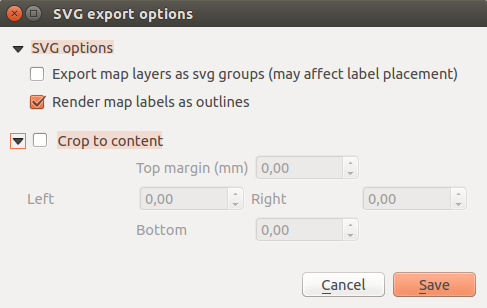
Opțiuni de Export SVG
Note
În prezent, producerea SVG-ului este foarte simplă. Aceasta nu ține de QGIS, ci de biblioteca Qt de la bază. Acest lucru se va schimba, sperăm, în versiunile viitoare.
Exportare ca PDF
Exportare ca PDF exportă toată compoziția într-un singur fișier PDF.
If you applied to your composition or any shown layer an advanced effect such as blend modes, transparency or symbol effects, these cannot be printed as vectors and your effects may be lost. Checking Print as a raster in Composition tab helps to keep the effects but rasterize the composition. Note that the Force layer to render as raster in the Rendering tab of Layer Properties is a layer-level alternative that avoids global composition rasterization.
Generarea unui Atlas
The Print Composer includes generation functions that allow you to create map books in an automated way. The concept is to use a coverage layer, which contains geometries and fields. For each geometry in the coverage layer, a new output will be generated where the content of some canvas maps will be moved to highlight the current geometry. Fields associated with this geometry can be used within text labels.
Every page will be generated with each feature. To enable the generation of an atlas and access generation parameters, refer to the Atlas generation tab. This tab contains the following widgets (see figure_composer_atlas_1):
Figure Composer Atlas 1:
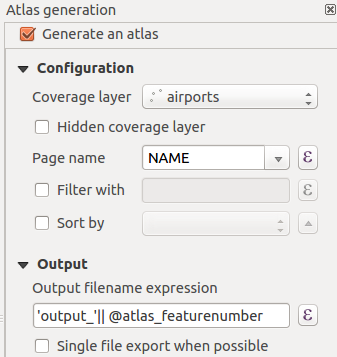
Fila de generare a atlasului
- Generare atlas, care activează sau dezactivează generarea atlasului.
- A Coverage layer
 combo box that allows you to choose
the (vector) layer containing the features on which to iterate over.
combo box that allows you to choose
the (vector) layer containing the features on which to iterate over. - An optional Hidden coverage layer that, if checked,
will hide the coverage layer (but not the other ones) during the generation.
- An optional Page name combo box to give a more explicit name to each feature page(s) when previewing atlas. You can select an attribute of the coverage layer or set an expression. If this option is empty, QGIS will use an internal ID, according to the filter and/or the sort order applied to the layer.
- An optional Filter with text area that allows you to specify an expression for filtering features from the coverage layer. If the expression is not empty, only features that evaluate to True will be selected. The button on the right allows you to display the expression builder.
- An optional Sort by that, if checked, allows you to
sort features of the coverage layer. The associated combo box allows you to
choose which column will be used as the sorting key. Sort order (either
ascending or descending) is set by a two-state button that displays an up or
a down arrow.
De asemenea, aveți opțiuni de setare a ieșirii atlasului:
- An Output filename expression textbox that is used to generate a filename for each geometry if needed. It is based on expressions. This field is meaningful only for rendering to multiple files.
- A Single file export when possible that allows you to
force the generation of a single file if this is possible with the chosen output
format (PDF, for instance). If this field is checked, the value of the
Output filename expression field is meaningless.
You can use multiple map items with the atlas generation; each map will be rendered
according to the coverage features. To enable atlas generation for a specific map
item, you need to check Controlled by Atlas under the item
properties of the map item.
Once checked, you can set:
- A
 Margin around feature that allows you to select
the amount of space added around each geometry within the allocated map.
Its value is meaningful only when using the auto-scaling mode.
Margin around feature that allows you to select
the amount of space added around each geometry within the allocated map.
Its value is meaningful only when using the auto-scaling mode. O
 Scară predefinită (cea mai bună încadrare). Aceasta va utiliza cea mai bună opțiune de încadrare, din lista de scări predefinite în proprietățile proiectului dvs. (a se vedea Proiect –> Proprietățile Proiectului –> General –> Scările Proiectului pentru a configura aceste scări predefinite).
- A Fixed scale that allows you to toggle between
auto-scale and fixed-scale mode.
In fixed-scale mode, the map will only be translated for each geometry to be centered.
In auto-scale mode, the map’s extents are computed in such a way that
each geometry will appear in its entirety.
Etichete
In order to adapt labels to the feature the atlas plugin iterates over, you can include expressions. What you should take care of is to place expression part (including functions, fields or variables) between [% and %]. For example, for a city layer with fields CITY_NAME and ZIPCODE, you could insert this:
The area of [% upper(CITY_NAME) || ',' || ZIPCODE || ' is '
format_number($area/1000000,2) %] km2
sau, o altă combinație:
The area of [% upper(CITY_NAME)%],[%ZIPCODE%] is
[%format_number($area/1000000,2) %] km2
The information [% upper(CITY_NAME) || ',' || ZIPCODE || ' is ' format_number($area/1000000,2) %] is an expression used inside the label. both expressions would result in the generated atlas as:
The area of PARIS,75001 is 1.94 km2
Butoane de Suprascriere Definită de Date
There are several places where you can use a  Data Defined
Override button to override the selected setting. These options are particularly
useful with Atlas Generation.
Data Defined
Override button to override the selected setting. These options are particularly
useful with Atlas Generation.
For the following examples the Regions layer of the QGIS sample dataset is used and selected for Atlas Generation. We also assume the paper format A4 (210X297) is selected in the Composition tab for field Presets.
With a Data Defined Override button you can dynamically set the paper orientation. When the height (north-south) of the extents of a region is greater than its width (east-west), you rather want to use portrait instead of landscape orientation to optimize the use of paper.
In the Composition you can set the field Orientation
and select Landscape or Portrait. We want to set the orientation dynamically
using an expression depending on the region geometry.
Press the button of field Orientation, select
Edit... so the Expression string builder dialog opens.
Enter the following expression:
CASE WHEN bounds_width($atlasgeometry) > bounds_height($atlasgeometry)
THEN 'Landscape' ELSE 'Portrait' END
Now the paper orients itself automatically. For each Region you need to reposition
the location of the composer item as well. For the map item you can
use the button of field Width to set it
dynamically using following expression:
(CASE WHEN bounds_width($atlasgeometry) > bounds_height($atlasgeometry)
THEN 297 ELSE 210 END) - 20
Folosiți butonul al câmpului Înălțime pentru a obține următoarea expresie:
(CASE WHEN bounds_width($atlasgeometry) > bounds_height($atlasgeometry)
THEN 210 ELSE 297 END) - 20
When you want to give a title above the map in the center of the page,
insert a label item above the map. First use the item properties of the label
item to set the horizontal alignment to Center.
Next activate from Reference point the upper middle checkbox.
You can provide the following expression for field X :
(CASE WHEN bounds_width($atlasgeometry) > bounds_height($atlasgeometry)
THEN 297 ELSE 210 END) / 2
For all other composer items you can set the position in a similar way so they are correctly positioned when the page is automatically rotated in portrait or landscape.
Information provided is derived from the excellent blog (in English and Portuguese) on the Data Defined Override options Multiple_format_map_series_using_QGIS_2.6 .
Acesta este doar un exemplu despre cum se pot utiliza opțiunile de Înlocuire Definită de Date.
Previzualizare și generare
Figure Composer Atlas 2:

Bara instrumentelor de previzualizare a atlasului
Once the atlas settings have been configured and composer items (map, table,
image...) linked to it, you can create a preview of all the pages by clicking
Atlas ‣ Preview Atlas or  Preview Atlas icon.
You can then use the arrows in the same toolbar to navigate through all the
features:
Preview Atlas icon.
You can then use the arrows in the same toolbar to navigate through all the
features:
 Prima entitate
 Entitatea anterioară
 Următoarea entitate
 Ultima entitate
You can also use the combo box to directly select and preview a specific feature. The combo box shows atlas features name according to the expression set in the atlas Page name option.
As for simple compositions, an atlas can be generated in different ways (see Generarea unui Rezultat for more information). Instead of Composer menu, rather use tools from Atlas menu or Atlas toolbar.
This means that you can directly print your compositions with Atlas ‣ Print Atlas.
You can also create a PDF using Atlas ‣ Export Atlas as PDF...:
The user will be asked for a directory to save all the generated PDF files,
except if the Single file export when possible has been
selected. In that case, you’ll be prompted to give a filename.
With Atlas ‣ Export Atlas as Images... or Atlas ‣ Export Atlas as SVG... tool, you’re also prompted to select a folder. Each page of each atlas feature composition is exported to an image or SVG file.
Tip
Imprimă o entitate specifică a atlasului
If you want to print or export the composition of only one feature of the atlas, simply start the preview, select the desired feature in the drop-down list and click on Composer ‣ Print (or export... to any supported file format).