레이어 생성
Layers can be created in many ways, including:
empty layers from scratch;
layers from existing layers;
layers from the clipboard;
layers as a result of an SQL-like query based on one or many layers: the virtual layer.
QGIS also provides tools to import/export different formats.
Creating new vector layers
QGIS allows you to create new Shapefile layers, new SpatiaLite layers, new GPX layers and new Temporary Scratch layers. Creation of a new GRASS layer is supported within the GRASS plugin. (Please refer to section 새 GRASS 벡터 레이어 생성하기 for more information on creating GRASS vector layers.)
Creating a new GeoPackage layer
To create a new GeoPackage layer go to
 .
The New GeoPackage Layer dialog will
be displayed as shown in figure_create_geopackage.
.
The New GeoPackage Layer dialog will
be displayed as shown in figure_create_geopackage.
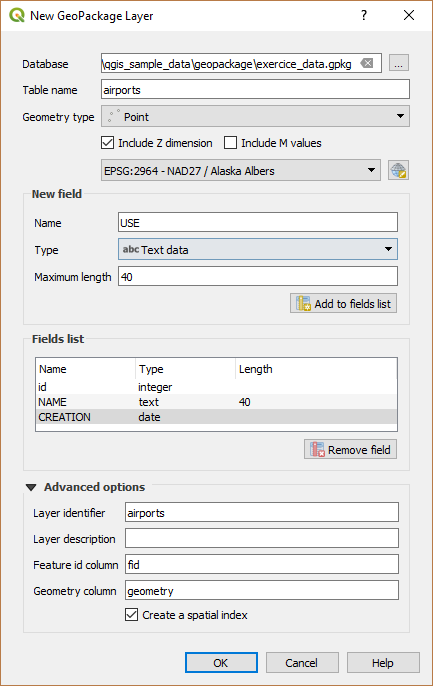
Creating a New GeoPackage layer dialog
The first step is to select an existing GeoPackage or create a new one. This can be done by pressing the ellipses … button at the right of the Database field. Then, give a name for the new layer, define the layer type and specify the coordinate reference system with Specify CRS.
To define an attribute table for the new GeoPackage layer, add the names of the attribute columns you want to create with the corresponding column type, and click on the Add to Fields List button. Once you are happy with the attributes, click OK. QGIS will automatically add the new layer to the legend, and you can edit it in the same way as described in section 기존 레이어 디지타이즈 작업.
새 shapefile 레이어 생성하기
To create a new Shapefile layer, choose
 from the
menu or select it from the Data Source Manager
toolbar. The New Shapefile Layer dialog will be
displayed as shown in figure_create_shapefile.
The first step is to provide a path and name for the Shapefile. QGIS will
automatically add the
from the
menu or select it from the Data Source Manager
toolbar. The New Shapefile Layer dialog will be
displayed as shown in figure_create_shapefile.
The first step is to provide a path and name for the Shapefile. QGIS will
automatically add the .shp extension to the name you specify
Next, choose the type of layer (point, line or polygon) and optional Z or M
dimensions, as well as the CRS (coordinate reference system).
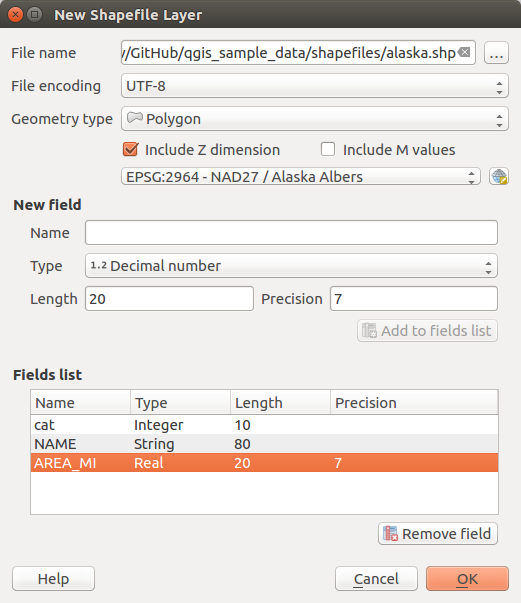
새 shapefile 레이어 생성 대화창
To complete the creation of the new Shapefile layer, add the desired attributes
by specifying a name and type for each attribute and clicking on the
Add to Fields List button.
A first 〈id〉 column is added by default but can be
removed, if not wanted. Only Decimal number  ,
Whole number , Text data
and Date attributes are
supported. Additionally, depending on the attribute type, you can also define
the length and precision of the new attribute column. Once you are happy with the
attributes, click OK.
Once the Shapefile has been created, it will be added to the map as a new layer,
and you can edit it in the same way as described in section 기존 레이어 디지타이즈 작업.
,
Whole number , Text data
and Date attributes are
supported. Additionally, depending on the attribute type, you can also define
the length and precision of the new attribute column. Once you are happy with the
attributes, click OK.
Once the Shapefile has been created, it will be added to the map as a new layer,
and you can edit it in the same way as described in section 기존 레이어 디지타이즈 작업.
새 SpatiaLite 레이어 생성하기
To create a new SpatiaLite layer for editing, choose  from the
menu or select it from the Data Source Manager
toolbar.
The New SpatiaLite Layer dialog will be displayed as shown in
Figure_create_spatialite.
from the
menu or select it from the Data Source Manager
toolbar.
The New SpatiaLite Layer dialog will be displayed as shown in
Figure_create_spatialite.

새 SpatiaLite 레이어 생성 대화창
The first step is to select an existing SpatiaLite database or to create a new
SpatiaLite database. This can be done with the … button at
the right of the database field. Then, add a name for the new layer, define
the layer type, and specify the coordinate reference system with Specify CRS.
If desired, you can select  Create an autoincrementing primary key.
To define an attribute table for the new SpatiaLite layer, add the names of the attribute columns you want to create with the corresponding column type, and click on the Add to Fields List button. Once you are happy with the attributes, click OK. QGIS will automatically add the new layer to the legend, and you can edit it in the same way as described in section 기존 레이어 디지타이즈 작업.
데이터베이스 관리자를 통해 SpatiaLite 레이어를 심화 관리할 수 있습니다. DB Manager Plugin 를 참조하세요.
새 GPX 레이어 생성하기
새 GPX 파일을 생성하려면, 먼저 GPS 플러그인을 불러와야 합니다.  메뉴 옵션을 선택하면 플러그인 관리자 대화창이 열립니다. GPS Tools 체크박스를 활성화하십시오.
When this plugin is loaded, choose  from the menu.
In the Save new GPX file as dialog, choose where to save the
new file and press Save. Three new layers are added to the
Layers Panel:
from the menu.
In the Save new GPX file as dialog, choose where to save the
new file and press Save. Three new layers are added to the
Layers Panel: waypoints, routes and tracks with
predefined structure.
새 임시 스크래치 레이어 생성하기
Temporary Scratch Layers are in-memory layers, meaning that they are not saved on disk and will be discarded when QGIS is closed. They can be handy to store features you temporarily need or as intermediate layers during geoprocessing operations.
Empty, editable temporary scratch layers can be defined using  or New temporary scratch layer button from the Data
Source Manager Toolbar. Here you can create a:
or New temporary scratch layer button from the Data
Source Manager Toolbar. Here you can create a:
No geometrytype layer, served as simple table,PointorMultiPointlayer,LineString/CompoundCurveorMultiLineString/MultiCurvelayer,Polygon/CurvePolygonorMultiPolygon/MultiSurfacelayer.
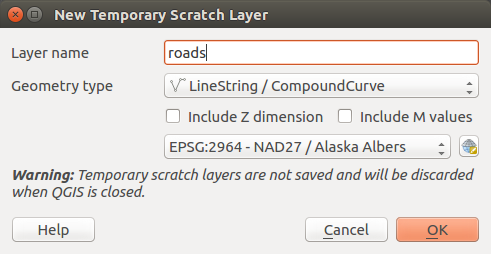
Creating a new Temporary Scratch layer dialog
By default, a new temporary scratch layer is created without any attribute. But you can also create prepopulated temporary scratch layers using e.g. the clipboard (see Creating new layers from the clipboard) or as a result of a Processing algorithm.
팁
Permanently store a memory layer on disk
To avoid data loss when closing project with temporary scratch layers, you can save these layers to any vector format supported by QGIS:
clicking the
 indicator icon next to the layer;
selecting the Make permanent entry in the layer contextual menu;
or as of any other vector layer, using the entry from the contextual menu or the menu.
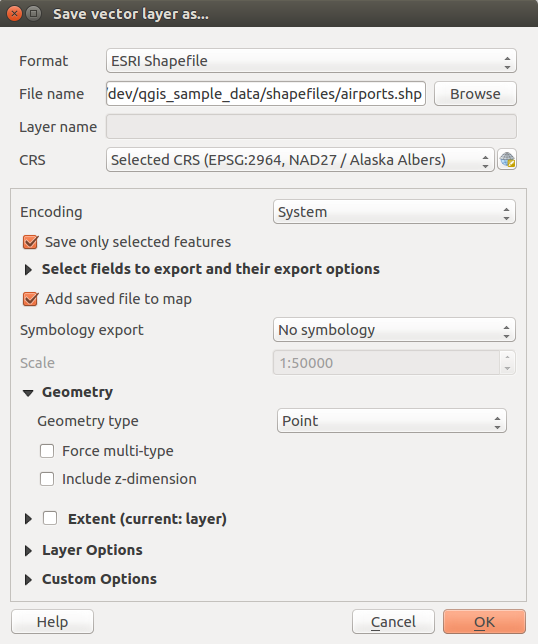
Each of these commands prompts the Save Vector Layer as dialog exposed in Creating new layers from an existing layer section and the saved file replaces the temporary one in the Layers panel.
Creating new layers from an existing layer
Both raster and vector layers can be saved in a different format and/or reprojected to a different coordinate reference system (CRS) using the menu or right-clicking on the layer in the Layers panel and selecting:
for raster layer
or for vector layer.
Drag’n drop layer from the layer tree to the PostGIS entry in the Browser Panel. Note that you should have already a PostGIS connection in the Browser Panel.
공통 파라미터
The Save Layer as… dialog shows several parameters to change the behavior when saving the layer. Among the common parameters for raster and vector are:
File name
CRS: can be changed to reproject the data
Add saved file to map: to add the new layer to the canvas
Extent: layer, Map view 또는 user-defined 범위 가운데 하나를 선택할 수 있습니다.
그런데 다음 몇몇 파라미터는 래스터 및 벡터 유형에 특화돼 있습니다:
래스터 특화 파라미터
Depending on the format of export, some of these options may not be available:
Output mode: raw data 또는 rendered image 가운데 하나를 선택할 수 있습니다.
Format: exports to any raster format GDAL can write to, such as GeoTiff, GeoPackage, MBTiles, Geospatial PDF, SAGA GIS Binary Grid, Intergraph Raster, ESRI .hdr Labelled…
Resolution
Create Options: use advanced options (file compression, block sizes, colorimetry…) when generating files, either from the predefined create profiles related to the output format or by setting each parameter.
Pyramids 생성
VRT Tiles in case you opted to
Create VRTNo data values
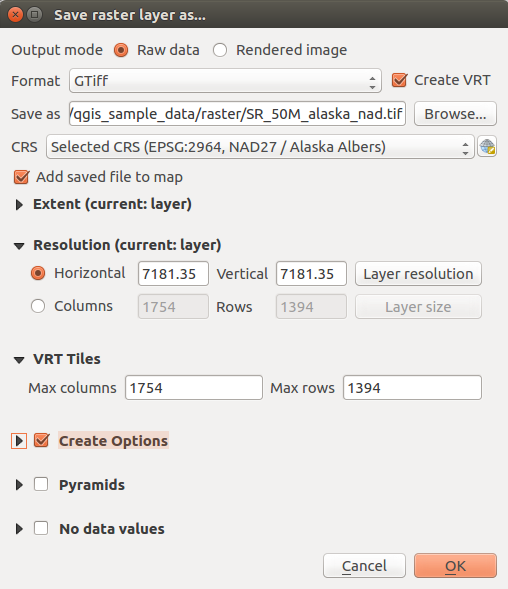
새 래스터 레이어로 저장하기
벡터 특화 파라미터
내보내기 포맷에 따라, 다음 옵션 가운데 일부를 사용하지 못 할 수도 있습니다:
Format: exports to any vector format GDAL can write to, such as GeoPackage, ESRI Shapefile, AutoCAD DXF, ESRI FileGDB, Mapinfo TAB or MIF, SpatiaLite, CSV, KML, ODS…
Layer name depending on the selected format
Encoding
Save only selected features
Select fields to export and their export options: 사용자가
value map같은 편집 위젯 으로 필드 습성을 설정한 경우, Replace all selected raw fields values by displayed values 를 체크하면 레이어 안에 표시된 값을 유지할 수 있습니다.Symbology export: 주로 DXF 내보내기에 사용되지만, DXF, KML, TAB 파일 포맷처럼 OGR 피처 스타일을 관리하는 (다음 주석 참조) 모든 파일 포맷으로 내보낼 수 있습니다.
No symbology: 데이터를 읽는 응용 프로그램의 기본 스타일
Feature symbology: OGR 피처 스타일로 스타일을 저장 (다음 주석 참조)
Symbol Layer symbology: OGR 피처 스타일로 저장(다음 주석 참조)하지만 심볼 레이어가 반복해서 이용한 심볼이 있을 경우 동일 도형을 반복해서 내보냅니다.
Scale: 최신 옵션에 축척값을 적용할 수 있습니다.
참고
OGR Feature Styles are a way to store style directly in the data as a hidden attribute. Only some formats can handle this kind of information. KML, DXF and TAB file formats are such formats. For advanced users, you can read the OGR Feature Styles specification document.
Geometry: 산출물 레이어의 도형 능력 환경을 설정할 수 있습니다.
geometry type: keeps the original geometry of the features when set to Automatic, otherwise removes or overrides it with any type. You can add an empty geometry column to an attribute table, remove the geometry column of a spatial layer.
Force multi-type: forces creation of multi-geometry features in the layer.
Include z-dimension: 도형에 Z 차원을 포함시킵니다.
팁
Overriding layer geometry type makes it possible to do things like save a
geometryless table (e.g. .csv file) into a shapefile WITH any type of
geometry (point, line, polygon), so that geometries can then be manually added
to rows with the  Add Part tool.
Datasources Options, Layer Options or Custom Options which allow you to configure some advanced parameters. See the gdal-ogr driver documentation.
새 벡터 레이어로 저장하기
벡터 레이어를 기존 파일로 저장하는 경우, 사용자가 산출물 포맷(Geopackage, SpatiaLite, FileGDB 등등)의 능력에 따라 다음을 결정할 수 있습니다:
파일 전체를 덮어 쓰기
대상 레이어만 덮어 쓰기 (레이어명 설정 가능)
기존 대상 레이어에 피처 추가
새 필드가 있을 경우 필드와 함께 피처 추가
ESRI shapefile, MapInfo .tab 같은 포맷의 경우도 피처를 추가할 수 있습니다.
Creating new DXF files
Besides the Save As… dialog which provides options to export a
single layer to another format, including *.DXF, QGIS provides another
tool to export multiple layers as a single DXF layers. It’s accessible in the
menu.
In the DXF Export dialog:
Indicate the destination layer file.
Choose the symbology mode and scale (see the OGR Feature Styles note) if applicable.
Select the data Encoding.
Select the CRS to apply: the selected layers will be reprojected to the given CRS.
select the layers to include in the DXF files either by checking each in the table widget or automatically pick them from an existing map theme. The Select All and Deselect All buttons can also help to quickly set the data to export.
For each layer, you can also choose whether to export all the features in a single DXF layer or rely on a field whose values are used to split the features in generated destination layers in the DXF output.
Optionally, you can also choose to:
- Use the layer title as name if set instead of the
layer name itself;
- Export features intersecting the current map extent;
 Force 2d output (eg. to support polyline width);
- Export label as MTEXT elements or TEXT elements.
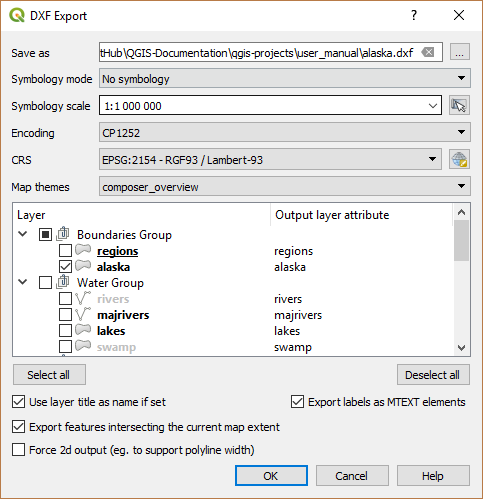
Exporting a project to DXF dialog
Creating new layers from the clipboard
클립보드 상에 있는 피처를 새 레이어로 붙여넣을 수 있습니다. 이 작업을 하려면, 피처를 몇 개 선택해서, 클립보드로 복사한 다음, 메뉴의 다음 메뉴 옵션을 선택해서 새 레이어에 붙여넣으십시오:
New Vector Layer…: you need to select the layer CRS, poping up the Save vector layer as… dialog from which you can select any supported data format (see Creating new layers from an existing layer for parameters);
or Temporary Scratch Layer…: you need to select the layer CRS and give a name.
선택한 피처 및 그 속성을 가진 새 레이어를 생성하고, 확인할 경우 맵 캔버스에 추가합니다.
참고
Creating layers from clipboard is possible with features selected and copied within QGIS as well as features from another application, as long as they are defined using well-known text (WKT) string.
Creating virtual layers
Virtual layers are a special kind of vector layer. They allow you to define a layer as the result of an SQL query involving any number of other vector layers that QGIS is able to open. Virtual layers do not carry data by themselves and can be seen as views to other layers.
To create a virtual layer, open the virtual layer creation dialog by:
clicking
 Add Virtual Layer option in the
menu;
Add Virtual Layer option in the
menu;enabling the
Add Virtual Layer tab in the
Data Source Manager dialog;or using the DB Manager dialog tree item.
The dialog allows you to specify a Layer name and an SQL Query. The query can use the name (or id) of loaded vector layers as tables, as well as their field names as columns.
예를 들면, airports 라는 레이어가 있을 경우 다음과 같은 SQL 쿼리를 통해 public_airports 라는 가상 레이어를 생성할 수 있습니다.
SELECT *
FROM airports
WHERE USE = "Civilian/Public"
The SQL query will be executed, regardless of the underlying provider of the
airports layer, even if this provider does not directly support SQL
queries.

가상 레이어 생성 대화창
Joins and complex queries can also be created, for example, to join airports and country information:
SELECT airports.*, country.population
FROM airports
JOIN country
ON airports.country = country.name
참고
DB Manager Plugin 의 SQL 창을 이용해서 가상 레이어를 생성할 수도 있습니다.
Embedding layers for use in queries
맵 캔버스에서 작업할 수 있는 벡터 레이어 이외에도, 사용자가 Embedded layers 목록에 레이어를 추가할 수 있습니다. 이 레이어는 맵 캔버스 또는 레이어 패널에 표시될 필요 없이 사용자가 쿼리에 이용할 수 있습니다.
레이어를 삽입하려면, Add 를 클릭한 다음 Local name, Provider, Encoding 그리고 Source 를 가리키는 경로를 입력하십시오.
Import 버튼을 누르면 맵 캔버스에 불러온 레이어를 삽입 레이어 목록에 추가할 수 있습니다. 이렇게 하면 향후 기존 쿼리를 고장내지 않고 레이어 패널에서 해당 레이어를 제거할 수 있습니다.
Supported query language
기저 엔진은 작업 수행에 SQLite 및 SpatiaLite 를 이용합니다.
즉 사용자가 로컬 설치한 SQLite가 지원하는 모든 SQL을 이용할 수 있다는 뜻입니다.
가상 레이어 쿼리에 SQLite의 기능 및 SpatiaLite의 공간 기능을 이용할 수도 있습니다. 예를 들어, 다음과 같은 쿼리를 통해 속성만 가지고 있는 레이어로부터 포인트 레이어를 생성할 수 있습니다:
SELECT id, MakePoint(x, y, 4326) as geometry
FROM coordinates
가상 레이어 쿼리에 QGIS 표현식 함수 를 이용할 수도 있습니다.
레이어의 도형 열을 참조하려면, geometry 명칭을 이용하십시오.
순수한 SQL 쿼리와는 달리, 가상 레이어 쿼리의 모든 필드는 명칭을 가지고 있어야 합니다. 사용자가 이용하는 열이 계산식 또는 함수 호출의 산출물일 경우 as 키워드를 사용해서 사용자 열을 명명해야 한다는 사실을 기억하십시오.
성능 문제
기본 파라미터를 설정하고 나면, 가상 레이어 엔진은 최선을 다해 쿼리의 서로 다른 열들의 유형을 – 도형 열이 존재할 경우 해당 열의 유형도 포함해서 – 탐지하려 할 것입니다.
이 탐지 작업은 가능한 경우 쿼리를 내부 검사하거나 또는 불가능할 경우 마지막 수단으로 쿼리의 첫 행(LIMIT 1)을 불러와서 이루어집니다. 레이어를 생성하기 위해서만 쿼리 결과의 첫 행을 불러오는 것은 성능 관련 이유 때문에 바람직하지 않을 수도 있습니다.
가상 레이어 생성 대화창에서 다음과 같은 성능 관련 파라미터들을 지정할 수 있습니다:
Unique identifier column: 이 옵션으로 QGIS가 행 식별자로 이용할 수 있는 유일 정수 값들을 나타내는 쿼리의 필드를 지정할 수 있습니다. 기본적으로, 자동 증가하는 정수 값이 쓰입니다. 유일 식별자 열을 정의하면 ID로 행을 선택하는 작업 속도를 향상시킬 수 있습니다.
No geometry: 이 옵션으로 가상 레이어가 모든 도형 필드를 강제로 무시하도록 만들 수 있습니다. 속성만 가지고 있는 레이어를 산출합니다.
도형 Column: 이 옵션으로 레이어의 도형으로 쓰일 열의 명칭을 지정할 수 있습니다.
도형 Type: 이 옵션으로 가상 레이어의 도형 유형을 지정할 수 있습니다.
도형 CRS: 이 옵션으로 가상 레이어의 좌표계를 지정할 수 있습니다.
특별 주석
가상 레이어 엔진은 쿼리의 각 열의 유형을 결정하려 합니다. 실패할 경우, 열 유형을 결정하기 위해 쿼리의 첫 행을 불러옵니다.
몇몇 특별 주석을 이용하면 쿼리 안에서 특정 열의 유형을 직접 지정할 수 있습니다.
특별 주석의 문법은 /*:type*/ 입니다. 열 명칭의 바로 뒤에 이 주석을 달아야 합니다. type 자리에 정수의 경우 int, 부동소수점 실수의 경우 real, 또는 문자열의 경우 text 를 넣을 수 있습니다.
다음은 예시입니다:
SELECT id+1 as nid /*:int*/
FROM table
도형 열의 유형 및 좌표계도 특별 주석으로 설정할 수 있습니다. 문법은 /*:gtype:srid*/ 입니다. 이때 gtype 자리에 도형 유형(point, linestring, polygon, multipoint, multilinestring 또는 multipolygon)을 넣을 수 있으며, srid 자리엔 좌표계의 EPSG 코드를 나타내는 정수값을 넣을 수 있습니다.
인덱스 사용
가상 레이어를 통해 레이어를 호출하는 경우, 이 원본 레이어의 인덱스를 다음 방식으로 이용할 것입니다:
레이어의 기본 키 열에 대해
=서술자(predicate)가 쓰인 경우, 기저 데이터 제공자에게 해당 특정 ID(FilterFid)를 물을 것입니다.다른 서술자(
>,<=,!=등등)가 쓰이거나 기본 키가 없는 열에 대해 쓰인 경우, 기저 벡터 데이터 제공자를 요청하는 데 표현식에서 생성된 요청을 이용할 것입니다. 즉 인덱스가 존재하는 경우 데이터베이스 제공자에 대해 인덱스를 이용할 수도 있다는 뜻입니다.
요청 내부의 공간 서술자를 처리하고 공간 인덱스 이용을 요청하는 데 특화된 문법이 존재합니다. 각 가상 레이어에 대해 _search_frame_ 이라는 숨은 열이 존재합니다. 이 열과 경계 상자와의 동일성을 비교할 수 있습니다. 다음은 그 예시입니다:
SELECT *
FROM vtab
WHERE _search_frame_=BuildMbr(-2.10,49.38,-1.3,49.99,4326)
이 공간 인덱스 문법과 함께 사용하는 경우, ST_Intersects 같은 공간 2진(binary) 서술자의 실행 속도가 현저히 빨라집니다.