Elementul Hartă
Efectuați clic pe butonul de  Adăugare a unei noi hărți, din bara de instrumente a Compozitorului, pentru a adăuga canevasul hărții QGIS. Apoi, ținând apăsat butonul stâng al mouse-ului, trasați un dreptunghi pe canevas, pentru a adăuga harta. Pentru afișarea hărții curente, puteți alege între trei moduri diferite, în fila Proprietăților Elementului.
Rectangle reprezintă setarea implicită. Se afișează doar o casetă goală, alături de mesajul ‘Harta va fi imprimată aici’.
Cache randează harta la rezoluția ecranului curent. Dacă ați mări sau ați micșora fereastra Compozitorului, harta nu va mai fi randată, însă imaginea va fi scalată.
Randarea se referă la faptul că, atunci când transfocați fereastra Compozitorului, harta va fi randată din nou, însă, din motive de spațiu, numai până la o rezoluție maximă.
Cache reprezintă modul de previzualizare implicit pentru hărțile nou adăugate în Compozitorul de Hărți.
You can resize the map item by clicking on the  Select/Move item
button, selecting the element, and dragging one of the blue handles in the
corner of the map. This button also helps to move the map to another place.
Select the item and while holding the left mouse button, move to the new place
and release the mouse button. After you have found the right place for an item,
you can lock the item position within the Print Composer canvas. Select the
map item and use the toolbar
Select/Move item
button, selecting the element, and dragging one of the blue handles in the
corner of the map. This button also helps to move the map to another place.
Select the item and while holding the left mouse button, move to the new place
and release the mouse button. After you have found the right place for an item,
you can lock the item position within the Print Composer canvas. Select the
map item and use the toolbar  Lock Selected Items or the
tab to Lock the item. A locked item can only be selected
using the tab. Once selected you can use the
tab to unlock individual items. The
Lock Selected Items or the
tab to Lock the item. A locked item can only be selected
using the tab. Once selected you can use the
tab to unlock individual items. The  Unlock All Items icon will unlock all locked composer items. With the
map selected, you can now adapt more properties in the map
Item Properties tab.
Unlock All Items icon will unlock all locked composer items. With the
map selected, you can now adapt more properties in the map
Item Properties tab.
Pentru a deplasa straturile în cadrul elementului hartă, mai întăi selectați harta, faceți clic pe pictograma de  Mutare a conținutului elementului, apoi deplasați straturile, utilizând butonul din stânga al mouse-ului.
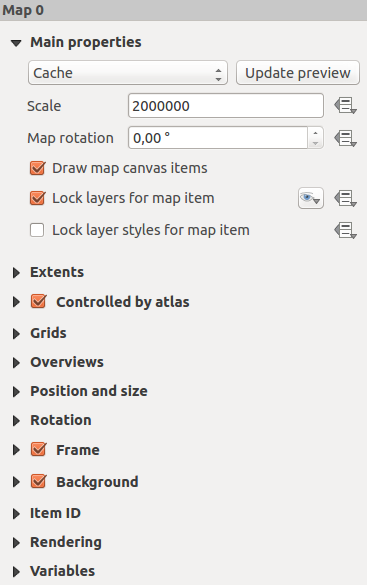
Dialogul Proprietăților principale de pe fila Proprietăților Elementului hărții, oferă următoarele functionalități (v. figure_composer_map_1):
Figure Composer Map 1:
The Preview area allows you to define the preview modes ‘Rectangle’, ‘Cache’
and ‘Render’, as described above. If you change the view on the QGIS map canvas by changing
vector or raster properties, you can update the Print Composer view by selecting the
map element in the Print Composer and clicking the [Update preview] button.
Câmpul Scării  setează o scară manuală.
The field Map rotation allows you to
rotate the map element content clockwise in degrees. The rotation of the map view can be imitated
here. Note that a correct coordinate frame can only be added with the default value 0 and that
once you defined a Map rotation it currently cannot be changed.
 Draw map canvas items lets you show annotations that may be placed
on the map canvas in the main QGIS window.
Draw map canvas items lets you show annotations that may be placed
on the map canvas in the main QGIS window.
You can choose to lock the layers shown on a map item. Check
Lock layers for map item.
After this is checked, any layer that would be displayed or hidden in the main QGIS window
will not appear or be hidden in the map item of the Composer. But style and labels of a
locked layer are still refreshed according to the main QGIS interface.
You can prevent this by using Lock layer styles for map item.
The  button allows you to add quickly all the presets views you
have prepared in QGIS.
Clicking on the button you will see the list of all the preset views:
just select the preset you want to display.
The map canvas will automatically lock the preset layers by enabling the
Lock layers for map item: if you want to unselect the preset, just uncheck the
and press the
button allows you to add quickly all the presets views you
have prepared in QGIS.
Clicking on the button you will see the list of all the preset views:
just select the preset you want to display.
The map canvas will automatically lock the preset layers by enabling the
Lock layers for map item: if you want to unselect the preset, just uncheck the
and press the  button. See Panoul Straturilor to find out how to
create presets views.
button. See Panoul Straturilor to find out how to
create presets views.
Locked layers in the map can also be data-defined, using
the  icon beside the option. When used, this overrides the
selection set in the drop-down list. You need to pass a list of layers separated
by | character.
The following example locks the map item to use only layers layer 1 and
layer 2:
icon beside the option. When used, this overrides the
selection set in the drop-down list. You need to pass a list of layers separated
by | character.
The following example locks the map item to use only layers layer 1 and
layer 2:
concat ('layer 1', '|', 'layer 2')
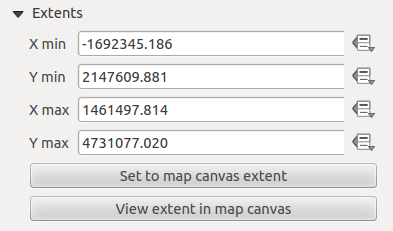
Dialogul Extinderilor de pe fila elementului hărții oferă următoarele functionalități (v. figure_composer_map_2):
Figure Composer Map 2:
- The Map extents area allows you to specify the map extent using X and Y min/max
values and by clicking the [Set to map canvas extent] button. This button sets
the map extent of the composer map item to the extent of the current map view in the
main QGIS application. The button [View extent in map canvas] does exactly the
opposite, it updates the extent of the map view in the QGIS application to the extent
of the composer map item.
If you change the view on the QGIS map canvas by changing
vector or raster properties, you can update the Print Composer view by selecting
the map element in the Print Composer and clicking the [Update preview] button
in the map Item Properties tab (see figure_composer_map_1).
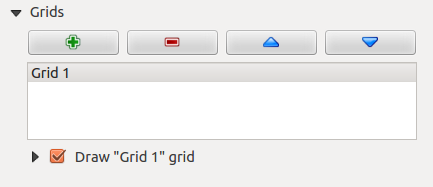
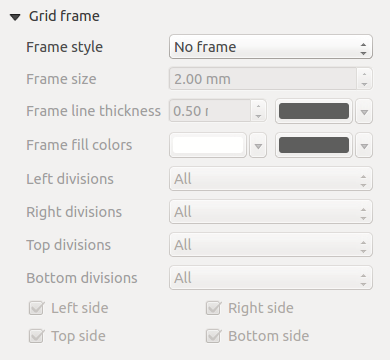
The Grids dialog of the map Item Properties tab provides the
possibility to add several grids to a map item.
Cu butoanele plus și minus puteți adăuga sau elimina o grilă selectată.
Cu ajutorul butoanelor în sus și în jos puteți muta o grilă în listă, pentru a seta prioritatea de desenare.
Dacă faceți dublu clic pe grila adăugată îi puteți da un alt nume.
Figure Composer Map 3:
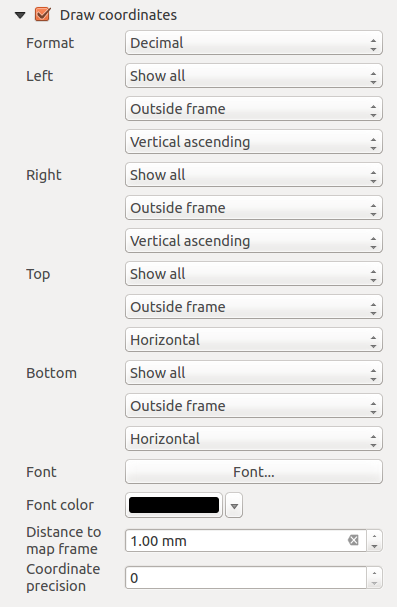
After you have added a grid, you can activate the checkbox
Draw grid to overlay a grid onto the map element. Expand this option to provide
a lot of configuration options, see Figure_composer_map_4.
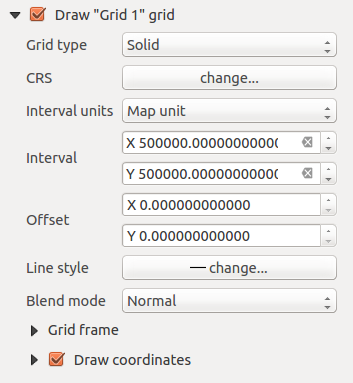
Figure Composer Map 4:
As grid type, you can specify to use a ‘Solid’, ‘Cross’, ‘Markers’ or ‘Frame and annotations only’.
‘Frame and annotations only’ is especially useful when working with rotated maps or reprojected
grids. In the divisions section of the Grid Frame Dialog mentioned below you then have a corresponding setting.
Symbology of the grid and its rendering mode can be chosen. See Modul de randare.
Furthermore, you can define an interval in the X and Y directions, an X and Y offset,
and the width used for the cross or line grid type.
Figure Composer Map 5:
Figure Composer map 6:
Dialogul Vizualizărilor de pe fila hărții cu Proprietățile Elementului oferă următoarele functionalități:
Figure Composer Map 7:
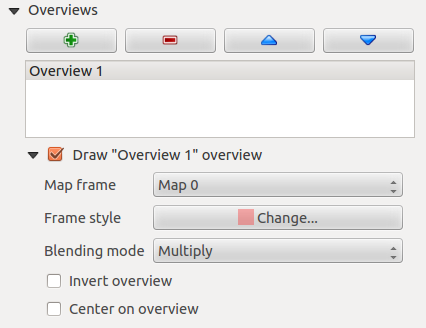
You can choose to create an overview map, which shows the extents of the other map(s)
that are available in the composer. First you need to create the map(s) you want to
include in the overview map and the map you want to use as the overview
map, just like a normal map.
Then expand Overviews option and press the green plus icon-button to add an overview.
Initially this overview is named ‘Overview 1’ (see Figure_composer_map_7).
You can change the name when you double-click on the overview item in the list
named ‘Overview 1’ and change it to another name.
Cu butoanele plus și minus puteți adăuga sau elimina o vizualizare.
Cu ajutorul butoanelor în sus și în jos puteți muta o vizualizare în listă, pentru a seta prioritatea de desenare.
Când selectați elementul imaginii de ansamblu în lista, îl puteți personaliza.