QGIS Configuration
QGIS is highly configurable through the Settings menu. Choose between Project Properties, Options and Customization.
Informacja
QGIS follows desktop guidelines for the location of options and project properties item. Consequently related to the OS you are using, location of some of items described below could be in the Project or the Settings menu.
Właściwości projektu
In the properties window for the project under  Settings ‣ Project Properties (kde) or
 Project ‣ Project Properties (Gnome, OS X or Windows), you
can set project-specific options.
Project ‣ Project Properties (Gnome, OS X or Windows), you
can set project-specific options.
In the General menu, the general settings let you:
- give a title to the project beside the project file path
- choose the color to use for features when they are selected
- choose the background color: the color to use for the map canvas
- set whether the path to layers in the project should be saved as absolute (full) or as relative to the project file location. You may prefer relative path when both layers and project files can be moved or shared or if the project is accessed from computers on different platforms.
- choose to avoid artifacts when project is rendered as map tiles. Note that checking this option can lead to performance degradation.
Calculating areas and distances is a common need in GIS. However, these values are really tied to the underlying projection settings. The Measurements frame lets you control these parameters. You can indeed choose:
- the ellipsoid to use: it can be an existing one, a custom one (you’ll need to set values of the semi-major and semi-minor axis) or None/Planimetric.
- the units for distance measurements for length and perimeter and
the units for area measurements. These settings, which default
to the units set in QGIS options but then overrides it for the current project,
are used in:
- Attribute table field update bar
- Field calculator calculations
- Identify tool derived length, perimeter and area values
- Default unit shown in measure dialog
The Coordinate display allows you to choose and customize the format of units to use to display the mouse coordinate in the status bar and the derived coordinates shown via the identify tool.
Finally, you can define a project scale list, which overrides the global predefined scales.

General tab of Project Properties dialog
Menu Układ współrzędnych umożliwia wybór układu dla bieżącego projektu oraz włączenie przeliczania w locie współrzędnych warstw wektorowych i rastrowych w przypadku, gdy zapisane są w innym układzie współrzędnych.
- With the Identify layers menu, you set (or disable) which layers will respond to the identify tool. By default, layers are set queryable.
- The Default Styles menu lets you control how new layers will be drawn when they do not have an existing .qml style defined. You can also set the default transparency level for new layers and whether symbols should have random colors assigned to them. There is also an additional section where you can define specific colors for the running project. You can find the added colors in the drop down menu of the color dialog window present in each renderer.
- The tab OWS Server allows you to define information about the QGIS Server WMS and WFS capabilities, extent and CRS restrictions.
W zakładce Makra tworzy się moduły Pythona dla projektu. Obecnie można zdefiniować trzy makra uruchamiane w czasie następujących zdarzeń: openProject(), saveProject() oraz closeProject().

Macro settings in QGIS
Zakładka Relacje służy do definiowania relacji 1:n. Gdy określone zostaną relacje dla którejś z warstw, w interfejsie użytkownika w widoku formularza pojawiać się będzie nowy element przedstawiający połączone obiekty (np. podczas użycia narzędzia informacji o obiekcie i włączeniu jego formularza). Daje to potężne możliwości przedstawiania dodatkowych informacji o obiektach, np. historycznych wynikach pomiarów rurociągu lub długości drogi. Więcej informacji o relacjach 1:n można znaleźć w rozdziale Creating one to many relations.
Opcje
 Some basic options for QGIS can be selected using the
Options dialog. Select the menu option Settings ‣
Options. The tabs where you can customize your
options are described below.
Some basic options for QGIS can be selected using the
Options dialog. Select the menu option Settings ‣
Options. The tabs where you can customize your
options are described below.
Zakładka Ogólne
Program
- Select the Style (QGIS restart required)
 and choose
between ‘Oxygen’,’Windows’,’Motif’,’CDE’, ‘Plastique’ and ‘Cleanlooks’ ().
and choose
between ‘Oxygen’,’Windows’,’Motif’,’CDE’, ‘Plastique’ and ‘Cleanlooks’ (). - Define the Icon theme . Currently only ‘default’ is
possible.
- Define the Icon size .
- Define the Font. Choose between
 Qt default and a user-defined font.
 - Change the Timeout for timed messages or dialogs .
 Nie pokazuj ekranu powitalnego przy starcie
- Pokazuj poradę przy starcie programu
- Pogrubiony tytuł grupy
- Styl QGIS grupy
- Use native color chooser dialogs
- Use live-updating color chooser dialogs
- Custom side bar style
- Experimental canvas rotation support (restart required)
Pliki projektów
- Open project on launch (choose between ‘New’,
‘Most recent’ and ‘Specific’). When choosing ‘Specific’ use the
 to define a project.
 - Twórz nowe projekty na bazie domyślnego. Możesz wybrać :guilabel:Bieżący projekt jako domyślny` or lub Wyczyść domyślny. Możesz wskazać katalog, w którym znajdować się będą szablony projektów zdefiniowane przez użytkownika. Gdy zapiszesz projekt w tym katalogu, pojawi się on jako pozycja w menu Projekt ‣ Nowy z szablonu.
- Informuj o konieczności zapisu, gdy projekt i źródło ulegną zmianie
- Prompt for confirmation when a layer is to be removed
- Ostrzegaj przy otwieraniu projektów zapisanych w starszych wersjach QGIS
- Enable macros . This option was created to handle
macros that are written to perform an action on project events. You can
choose between ‘Never’, ‘Ask’, ‘For this session only’ and
‘Always (not recommended)’.
Zakładka System
Środowisko
W zakładce System można teraz przeglądać wartości zmiennych środowiskowych, a wiele z nich można również edytować (zob. figure_environment_variables). Może się to przydać na platformach takich jak Mac, gdzie aplikacje GUI nie dziedziczą ustawień środowiskowych powłoki. Jest to również przydatne przy przeglądaniu i zmianie ustawień środowiska dla narzędzi zewnętrznych zarządzanych przez Geoprocesing (np. SAGA, GRASS) i przy włączaniu wyjścia debugowania dla określonych partii kodu źródłowego.
- Zastosuj zmienne użytkownika (wymaga ponownego uruchomienia; zawiera separatory). Zmienne można [Dodać] i [Usunąć]. Zdefiniowane dotychczas zmienna wyświetlane są w ramce Aktualne zmienne środowiska, przy czym istnieje możliwość filtrowania zmiennych poprzez zaznaczenie opcji Pokaż jedynie zmienne QGIS.
Figure System Environment:
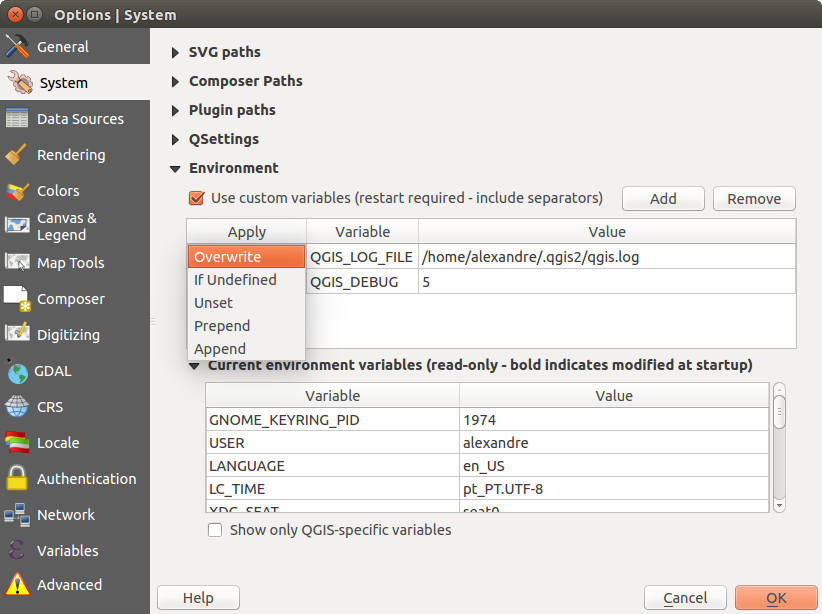
System environment variables in QGIS
Ścieżki wtyczek
[Dodaj] lub [Usuń] Ścieżki poszukiwań dodatkowych wtyczek C++
Zakładka Źródła danych
Tabela i atrybuty obiektów
- Otwórz tabelę atrybutów w oknie dokowalnym (wymaga restarty QGIS-a)
- Copy geometry in WKT representation from attribute
table. When using
 Copy selected rows to
clipboard from the Attribute table dialog, this has the
result that the coordinates of points or vertices are also copied to the
clipboard.
Copy selected rows to
clipboard from the Attribute table dialog, this has the
result that the coordinates of points or vertices are also copied to the
clipboard. - Attribute table behavior . There are three
possibilities: ‘Show all features’, ‘Show selected features’ and ‘Show
features visible on map’.
- Attribute table row cache
 . This row cache makes
it possible to save the last loaded N attribute rows so that working with the
attribute table will be quicker. The cache will be deleted when closing the
attribute table.
. This row cache makes
it possible to save the last loaded N attribute rows so that working with the
attribute table will be quicker. The cache will be deleted when closing the
attribute table. Wartość NULL jest reprezentowana przez. Można tu określić wartość dla pól zawierających wartość NULL.
Obsługa źródeł danych
- Scan for valid items in the browser dock . You can
choose between ‘Check extension’ and ‘Check file contents’.
- Scan for contents of compressed files (.zip) in browser dock
. ‘No’, ‘Basic scan’ and ‘Full scan’ are possible.
Pytaj o podwarstwy rastrowe przy otwieraniu. Niektóre rastry obsługują podwarstwy — w GDAL nazywane są one podzbiorami danych (subdatasets). Przykładem mogą być pliki netcdf — gdy istnieje wiele wariantów netcdf, GDAL rozpoznaje każdy z nich jako podzbiór danych. Ta opcja dotyczy sposobu, w jaki traktowane mają być podwarstwy, gdy otwierany jest plik z podwarstwami. Mamy do wyboru:
‘Zawsze’: zawsze pytaj (czy istnieją podwarstwy)
‘Jeśli konieczne’: pytaj, czy warstwa nie ma pasm, a posiada podwarstwy
‘Nigdy’: nigdy nie pytaj i nie ładuj podwarstw.
‘Wczytaj wszystkie’: nigdy nie pytaj, ale załaduj wszystkie podwarstwy
- Ignore shapefile encoding declaration. If a shapefile
has encoding information, this will be ignored by QGIS.
- Add PostGIS layers with double click and select in
extended mode
- Dodaj warstwy Oracle podwójnym kliknięciem i wybierz w trybie rozszerzonym
- Execute expressions on server-side if possible
- create transaction groups automatically whenever possible
(Experimental). When this mode is turned on, all
(postgres) layers from the same database are synchronised in their edit state,
i.e. when one layer is put into edit state, all are, when one layer is committed
or one layer is rolled back, so are the others. Also, instead of buffering edit
changes locally, they are directly sent to a transaction in the database which
gets committed when the user clicks save layer.
Hidden Browser Path
This widget lists all the folder you chose to hide from the Browser panel. Removing a folder from the list will make it available in the Browser panel.
Zakładka Renderowanie
Rendering behavior
- Domyślnie nowo dodawane warstwy są wyświetlane
- Użyj pamięci podręcznej aby przyspieszyć odświeżanie.
- Wykorzystuj wiele rdzeni CPU
- ale nie więcej niż
Odświeżaj widok mapy co (dmyślnie 250 ms)
- Enable feature simplification by default for newly added layers
Próg upraszczania (większe wartości to większe uproszczenia)
- Upraszczaj w źródle danych (jeśli to możliwe)
Maksymalna skala upraszczania (1:1 - zawsze)
Jakość wyświetlania
- Pokaż linie jako mniej postrzępione kosztem wydajności wyświetlania
Rastry
W Kanały RGB możesz określić numery kanałów czrwonego, zielonego i niebieskiego.
Wzmocnienie kontrastu
- Single band gray . A single band gray can have
‘No stretch’, ‘Stretch to MinMax’, ‘Stretch and Clip to MinMax’ and also
‘Clip to MinMax’.
- Multi band color (byte/band) . Options are ‘No stretch’,
‘Stretch to MinMax’, ‘Stretch and Clip to MinMax’ and ‘Clip to MinMax’.
- Multi band color (>byte/band) . Options are ‘No stretch’,
‘Stretch to MinMax’, ‘Stretch and Clip to MinMax’ and ‘Clip to MinMax’.
- Limits (minimum/maximum) . Options are
‘Cumulative pixel count cut’, ‘Minimum/Maximum’, ‘Mean +/- standard deviation’.
Łączna liczba pikseli
Wielokrotność odchylenia standardowego
Śledzenie błędów
- Odświeżanie obszaru mapy
Zakładka Mapa i legenda
Domyślny wygląd mapy (nadpisywany przez właściwości projektu)
Określ kolor obiektów zaznaczonych i kolor tła.
Legenda warstwy
- Double click action in legend . You can either
‘Open layer properties’ or ‘Open attribute table’ with the double click.
Można określić następujące opcje Stylu legendy:
- Nazwy warstw dużą literą
- Nazwy warstw pogrubione
- Nazwy grup pogrubione
- Wyświetl atrybuty klasyfikacji
- Twórz miniatury warstw rastrowych (może spowolnić program)
Zakładka Narzędzia mapy
This menu offers some options regarding the behavior of the Identify tool.
Promień wyszukiwania przy wskazywaniu obiektów i wyświetlaniu podpowiedzi jest wskaźnikiem tolerancji wyrażanym w procentach jednostkek mapy. Oznacza to, że narzędzie poda informacje o obiektach znajdujących się w promieniu mniejszym od tej tolerancji.
Kolor wybranych określa jakim kolorem rysowane będą identyfikowane obiekty.
- Buffer determines a buffer distance to be rendered from the outline of the identify highlight.
- Minimum width determines how thick should the outline of a highlighted object be.
Narzędzie pomiaru
Określenie koloru linijki dla narzędzi pomiarowych
Określenie Ilości cyfr dziesiętnych
- Keep base unit to not automatically convert large numbers
(e.g., meters to kilometers)
- Preferred distance units (‘Meters’, ‘Feet’,
‘Nautical Miles’, ‘Degrees’ or ‘Map Units’ )
- Preferred area units (‘Square meters’, ‘Square feet’,
‘Square yards’, ‘Hectares’, ‘Map Units’ ...)
- Preferred angle units (‘Degrees’, ‘Radians’, ‘Gon/gradians’,
‘Minutes of arc’ ...)
Przesuwanie i powiększanie
- Define Mouse wheel action (‘Zoom’, ‘Zoom and recenter’,
‘Zoom to mouse cursor’, ‘Nothing’)
Określanie Współczynnika powiększenia dla kółka myszy
Zdefiniowane skale
Here, you find a list of predefined scales. With the  and
and  buttons you can add or remove your personal scales.
You can also import or export scales from/to a .XML file. Note that you still have
the possibility to remove your changes and reset to the predefined list.
buttons you can add or remove your personal scales.
You can also import or export scales from/to a .XML file. Note that you still have
the possibility to remove your changes and reset to the predefined list.
Zakładka Wydruk
Domyślne ustawienia wydruku
You can define the Default font here.
Wygląd siatki
- Define the Grid style (‘Solid’, ‘Dots’, ‘Crosses’)
- Define the Grid color
Grid and guide defaults
- Define the Grid spacing
- Define the Grid offset for x and y
- Define the Snap tolerance
Zakładka Digitalizacja
Tworzenie obiektów
- Nie pokazuj okna z atrybutami po utworzeniu obiektu
- Użyj ostatnich wprowadzonych wartości atrybutu
- Validate geometries. Editing complex lines and polygons with many nodes can result in very slow rendering. This is because the default validation procedures in QGIS can take a lot of time. To speed up rendering, it is possible to select GEOS geometry validation (starting from GEOS 3.3) or to switch it off. GEOS geometry validation is much faster, but the disadvantage is that only the first geometry problem will be reported.
Linijka
Określenie grubości linii i koloru linii
Przyciąganie
- Dokowane okno opcji (wymaga restartu QGIS-a)
- Define Default snap mode (‘To vertex’, ‘To segment’,
‘To vertex and segment’, ‘Off’)
Domyślna tolerancja przyciągania w jednostkach mapy lub pikselach
Określ Promień wyszukiwania przy edycji wierzchołków w jednostkach mapy lub pikselach
Znaczniki wierzchołków
- Wyświetl znaczniki jedynie dla wybranych obiektów
- Define vertex Marker style (‘Cross’ (default), ‘Semi
transparent circle’ or ‘None’)
Określ Rozmiar markera wierzchołków
Przesunięcie krzywych
The next 3 options refer to the  Offset Curve tool
in Advanced digitizing. Through the various settings, it is possible to
influence the shape of the line offset. These options are possible starting from GEOS 3.3.
Offset Curve tool
in Advanced digitizing. Through the various settings, it is possible to
influence the shape of the line offset. These options are possible starting from GEOS 3.3.
Styl połączenia
Segmentów kwadrantu
Limit fazy (uciosu)
Zakładka Układ współrzędnych
Domyślny układ współrzędnych dla nowych projektów
 Don’t enable ‘on the fly’ reprojection
- Automatically enable ‘on the fly’ reprojection if
layers have different CRS
- Enable ‘on the fly’ reprojection by default
Zawsze stosuj ten układ dla nowych projektów i wybierz jakiś układ
Układ współrzędnych dla nowych warstw
To pole pozwala określić, co ma się zdarzyć, gdy tworzona jest nowa warstwa lub ładowana jest warstwa bez określonego układu współrzędnych.
- Prompt for CRS
- Use project CRS
- Use default CRS
Domyślne transformacje układów odniesienia
- Pytaj o transformację, gdy brak domyślnej
Jeśli korzystałeś już z reprojekcji w locie, informację o tym znajdziesz w okienku poniżej. Są tam informacje o źródłowych i docelowych układach współrzędnych płaskich i wysokościowych.
Zakładka Język
- Nadpisz ustawienia lokalne i Wybierz wersję językową
Wykryte ustawienia lokalne w twoim systemie
Authentication
In the Authentication tab you can set authentication configurations and manage PKI certificates. See Authentication System for more details.
Zakładka Sieć
Ogólne
Adres przeszukiwania WMS, domyślny to http://geopole.org/wms/search?search=\%1\&type=rss
Limit czasu dla zapytań sieciowych (ms) - domyślny wynosi 60000
Czas przedawnienia dla kafli WMSC/WMTS (h) - domyślny to 24
Można określić Limit prób przy błędach pobierania kafli
Klient użytkownika (User-Agent)
Figure Network Tab:

Proxy-settings in QGIS
Ustawienia cache
Katalog i Rozmiar dla cache.
- Użyj serwera proxy przy dostępie do sieci wymaga podania ‘Hosta’ i opcjonalnie ‘Portu’, ‘Użytkownika’ oraz ‘Hasła’.
- Set the Proxy type according to your needs.
Default Proxy: Proxy określany jest na podstawie ustawień aplikacji proxy
Socks5Proxy: ogólny proxy dla wszelkiego typu połączeń. Obsługuje TCP, UDP, binding do portu (dla połączeń przychodzących) oraz autoryzację.
HttpProxy: zaimplementowany z użyciem komendy “CONNECT”, obsługuje jedynie połączenia wychodzące. Obsługuje autoryzację.
HttpCachingProxy: Zaimplementowany przy użyciu zwykłych poleceń HTTP, użyteczny jedynie w kontekście zapytań HTTP.
FtpCachingProxy: Zaimplementowany przy użyciu pproxy FTP, użyteczny jedynie w kontekście zapytań FTP.
Można dodać wykluczenia niektórych URL w okienku tekstowym poniżej ustawień proxy (zob. Figure_Network_Tab).
Jeśli będziesz potrzebował bardziej szczegółowych informacji o ustawieniach proxy, zajrzyj do manuala w dokumentacji biblioteki QT, która dostępna jest pod adresem http://qt-project.org/doc/qt-4.8/qnetworkproxy.html#ProxyType-enum.
Wskazówka
Korzystanie z proxy
Korzystanie z proxy może być trudne. Można próbować kolejno wymienionych wyżej ustawień i sprawdzać, czy działają.
You can modify the options according to your needs. Some of the changes may require a restart of QGIS before they will be effective.
- Ustawienia zapisywane są pliku tekstowym: $HOME/.config/QGIS/QGIS2.conf
- swoje ustawienia znajdziesz w: $HOME/Library/Preferences/org.qgis.qgis.plist
- Ustawienia zapisane są w rejestrze pod: HKEY\CURRENT_USER\Software\QGIS\qgis
Personalizacja
The customization dialog lets you (de)activate almost every element in the QGIS user interface. This can be very useful if you want to provide your end-users with a ‘light’ version of QGIS, containing only the icons, menus or panels they need.
Informacja
Before your changes are applied, you need to restart QGIS.
Figure Customization 1:
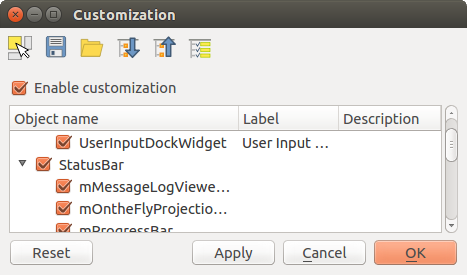
The Customization dialog
Ticking the Enable customization checkbox is the first step
on the way to QGIS customization. This enables the toolbar and the widget
panel from which you can uncheck and thus disable some GUI items.
The configurable item can be:
- a Menu or some of its sub-menus from the Pasek menu
- a whole Panel (see Panels and Toolbars)
- the Status bar described in Pasek statusu or some of its items
- a Toolbar: the whole bar or some of its icons
- or any widget from any dialog in QGIS: label, button, combobox...
With  Switch to catching widgets in main application, you
can click on an item in QGIS interface that you want to be hidden and
QGIS automatically unchecks the corresponding entry in the Customization dialog.
Switch to catching widgets in main application, you
can click on an item in QGIS interface that you want to be hidden and
QGIS automatically unchecks the corresponding entry in the Customization dialog.
Once you setup your configuration, click [Apply] or [Ok] to validate your changes. This configuration becomes the one used by default by QGIS at the next startup.
The modifications can also be saved in a .ini file using  Save To File button. This is a handy way to share a common QGIS
interface among multiple users. Just click on
Save To File button. This is a handy way to share a common QGIS
interface among multiple users. Just click on  Load from File
from the destination computer in order to import the .ini file.
You can also run command line tools and save various
setups for different use cases as well.
Load from File
from the destination computer in order to import the .ini file.
You can also run command line tools and save various
setups for different use cases as well.
Wskazówka
Easily restore predefined QGIS
The initial QGIS GUI configuration can be restored by one of the methods below:
- unchecking Enable customization option in the
Customization dialog or click the
 Check All button
 - pressing the [Reset] button in the QSettings frame under Settings ‣ Options menu, System tab
- launching QGIS at a command prompt with the following command line qgis --nocustomization
- setting to false the value of UI ‣ Customization ‣ Enabled variable under Settings ‣ Options menu, Advanced tab.
In most cases, you need to restart QGIS in order to have the change applied.